
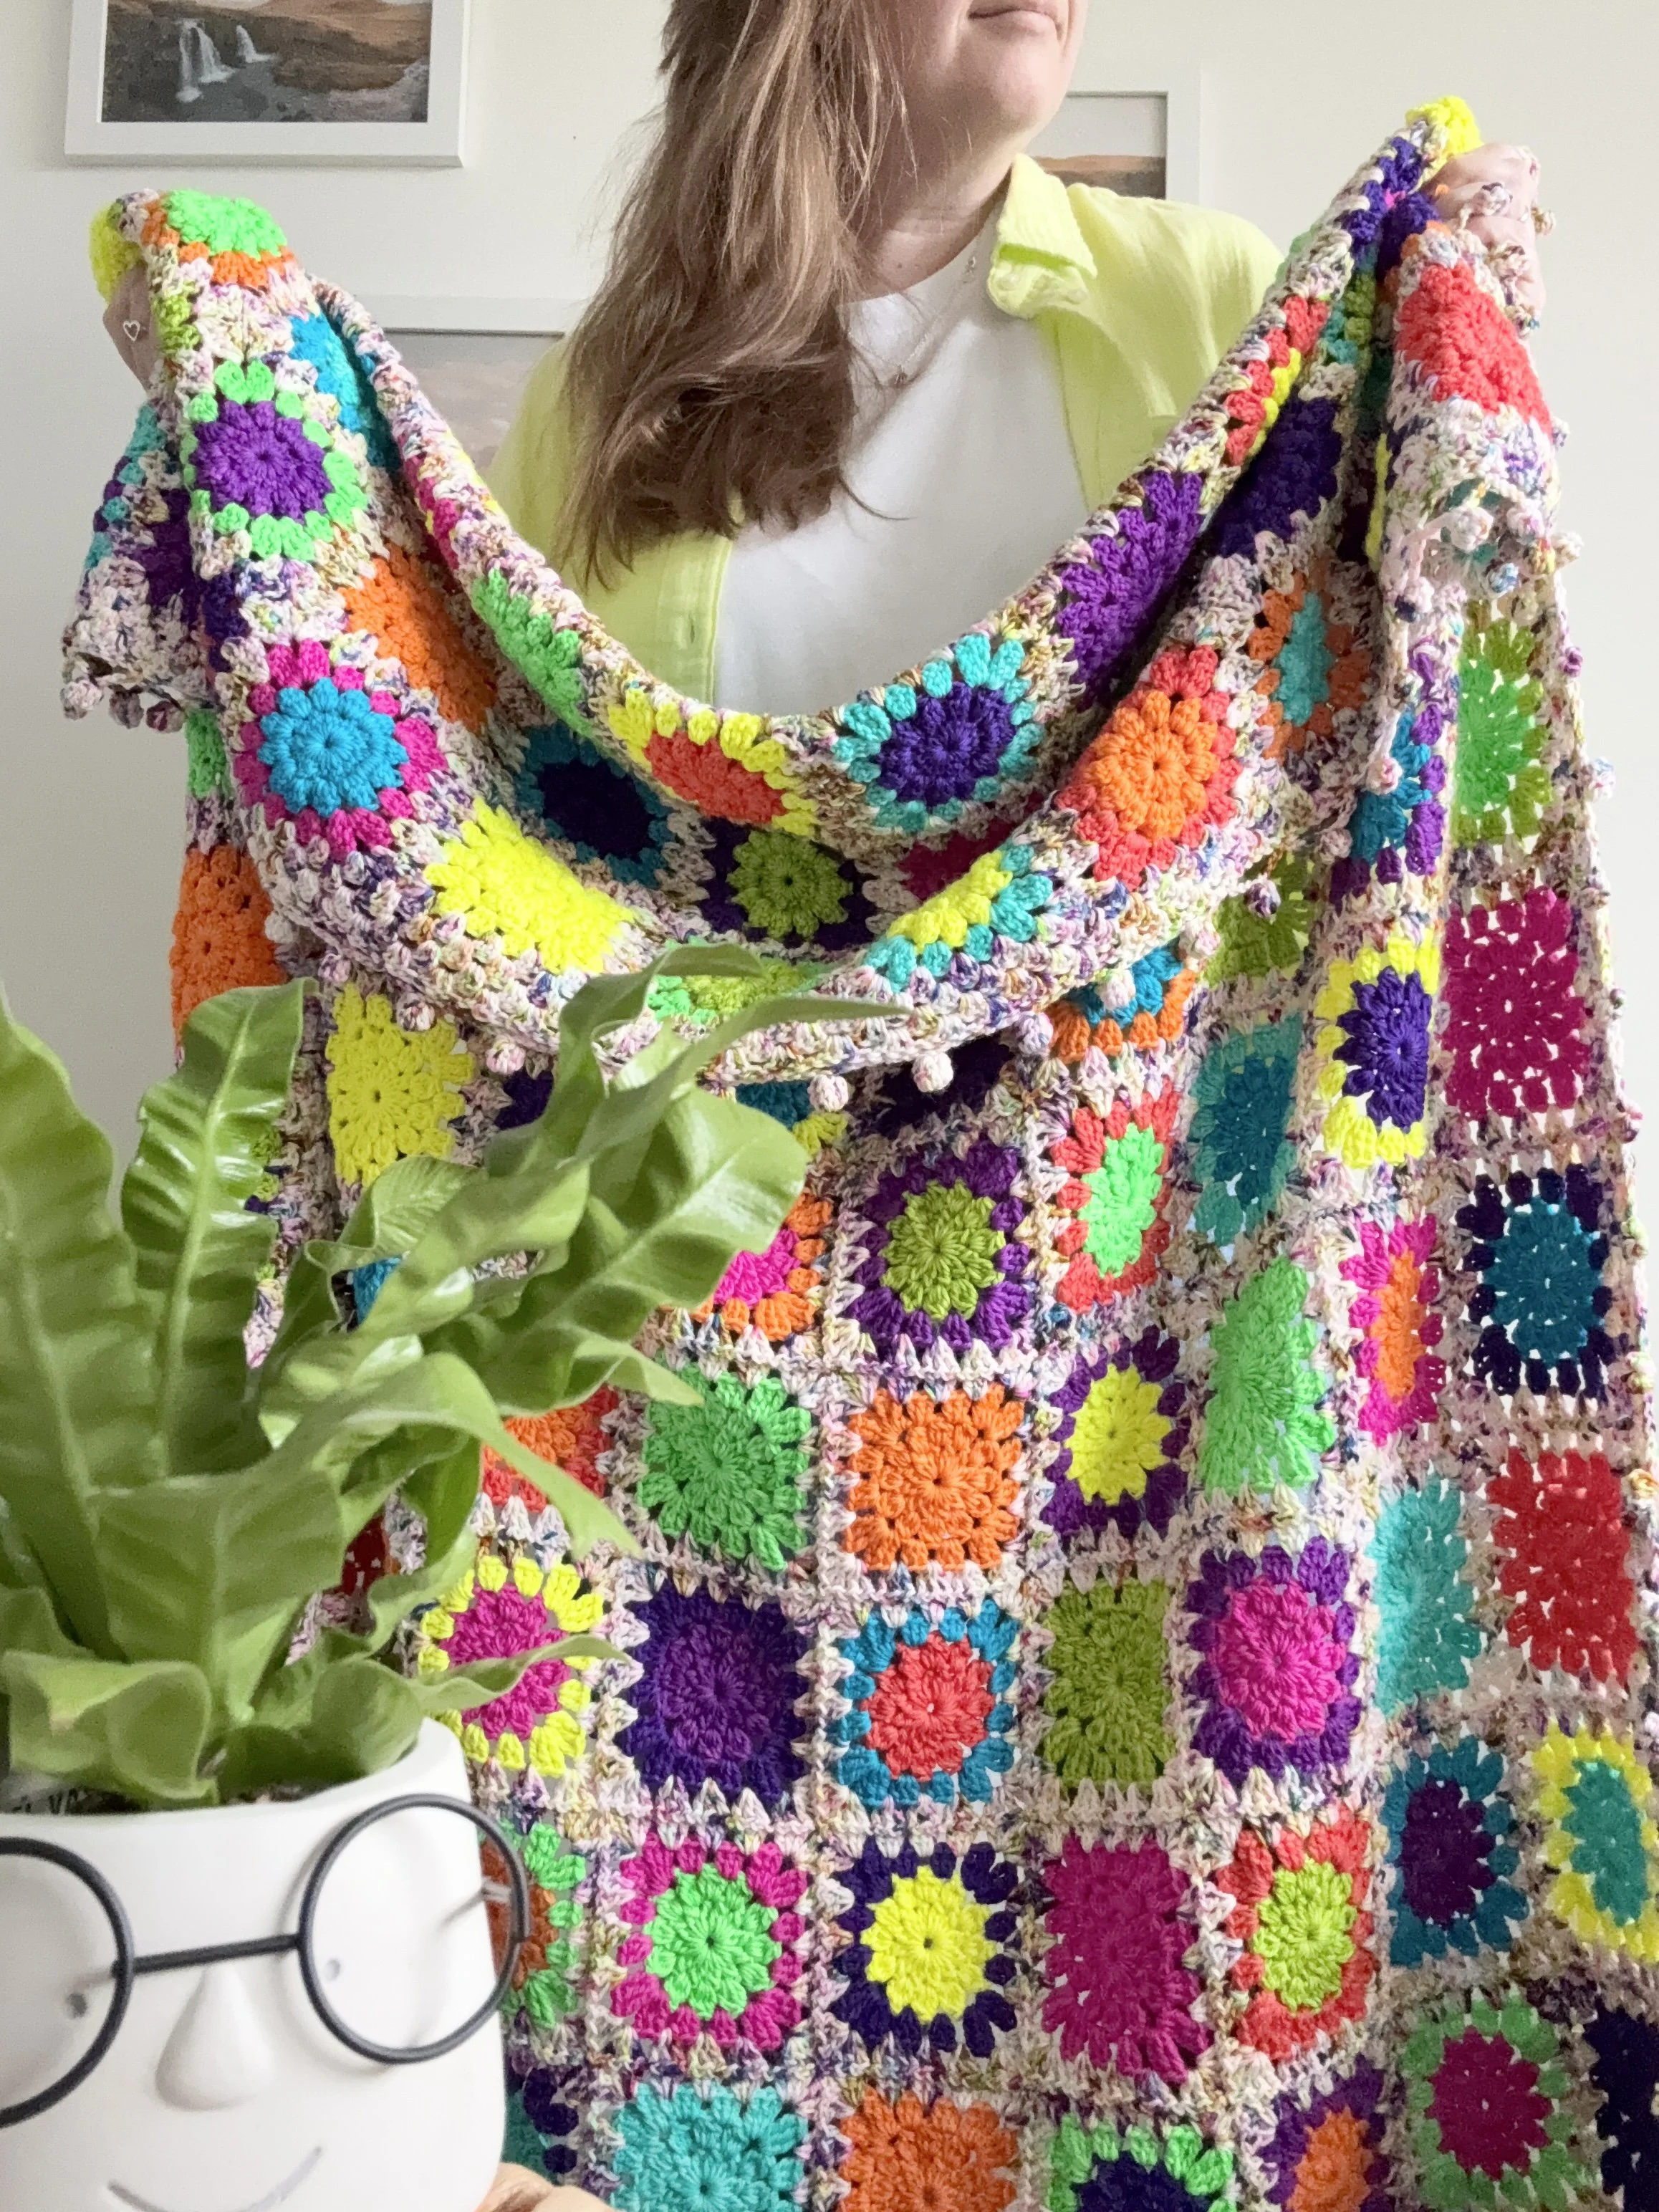
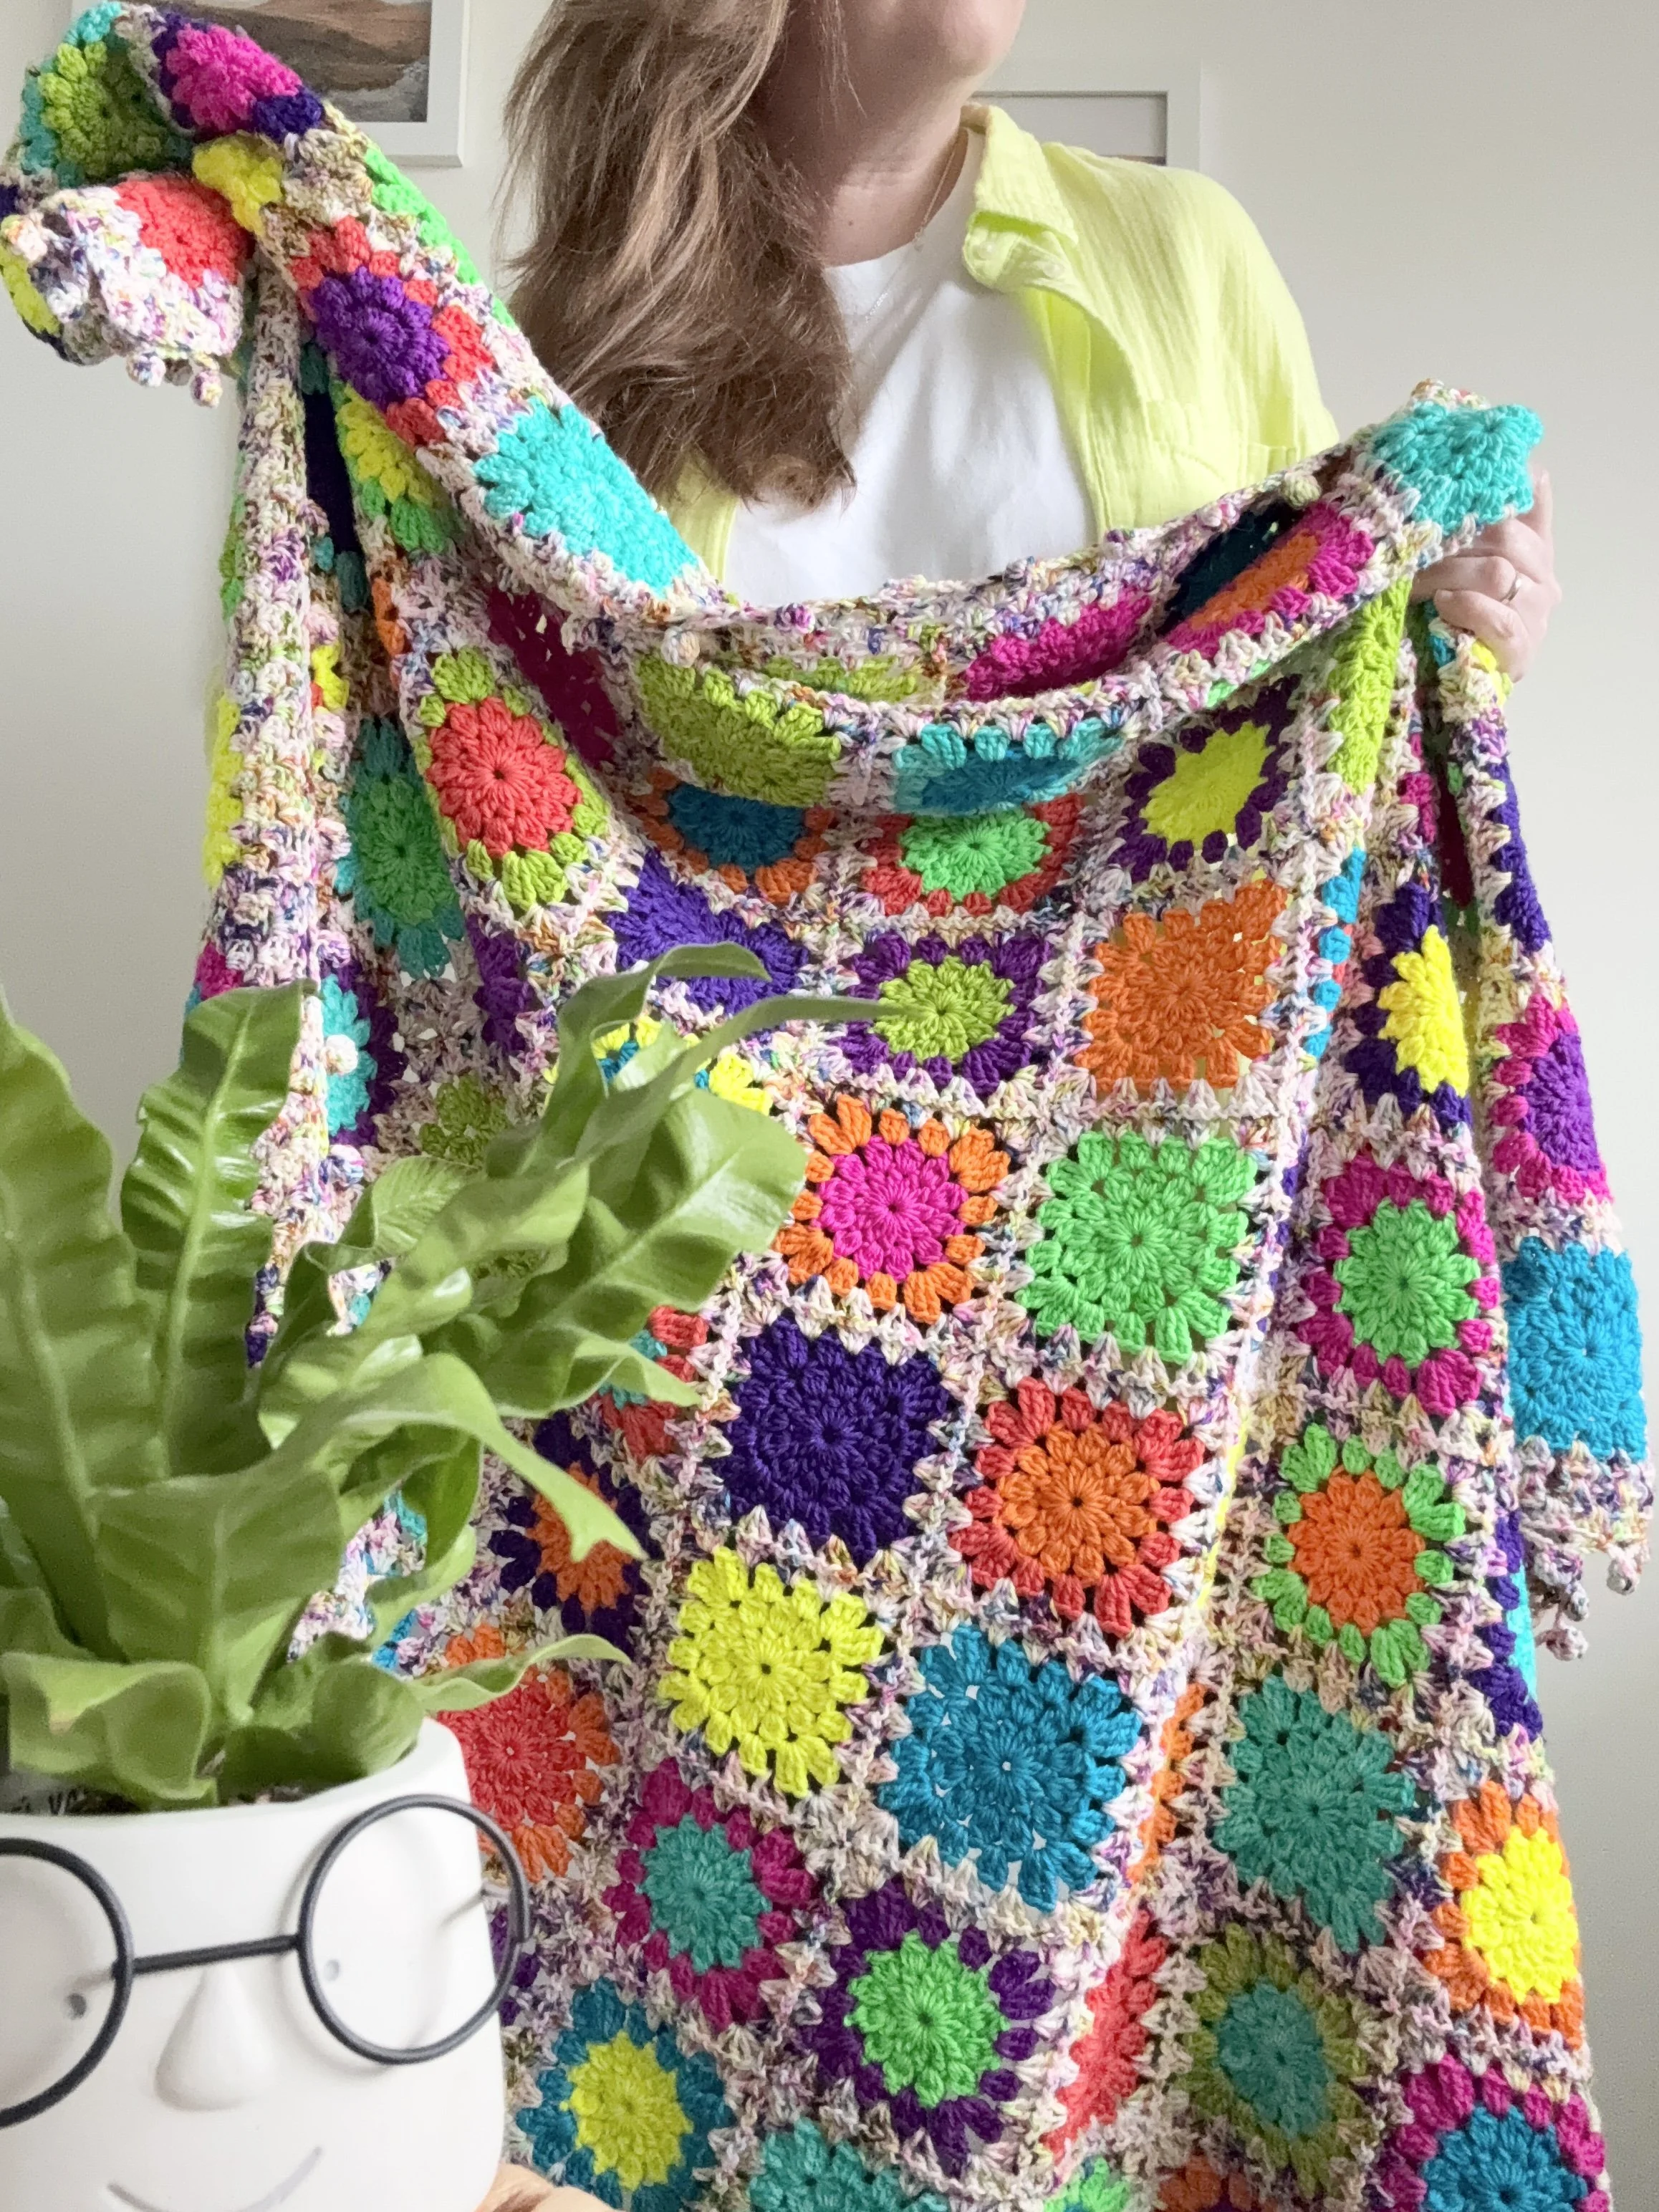
Nostalgia Starburst Blanket Pattern x Millenial Collection by The Frosted Stitch
This post contains affiliate links. Affiliate links cost you nothing, but when purchasing through these links you help me earn a small commission. This supports me and my family and my continued efforts to bring you free patterns.
Intro:
I have never had a harder time naming something in all my life. In the history of naming things, this one takes the cake. Speaking of cake… everything from Confetti, to Funfetti, to Sprinkles and Dreams were floated. None of it felt right (and also had been already in use by thousands of other patterns). I thought Friendship, Y2K, Millennial, Cottage, Camp and Vintage Starburst blankets would all work… alas, no.
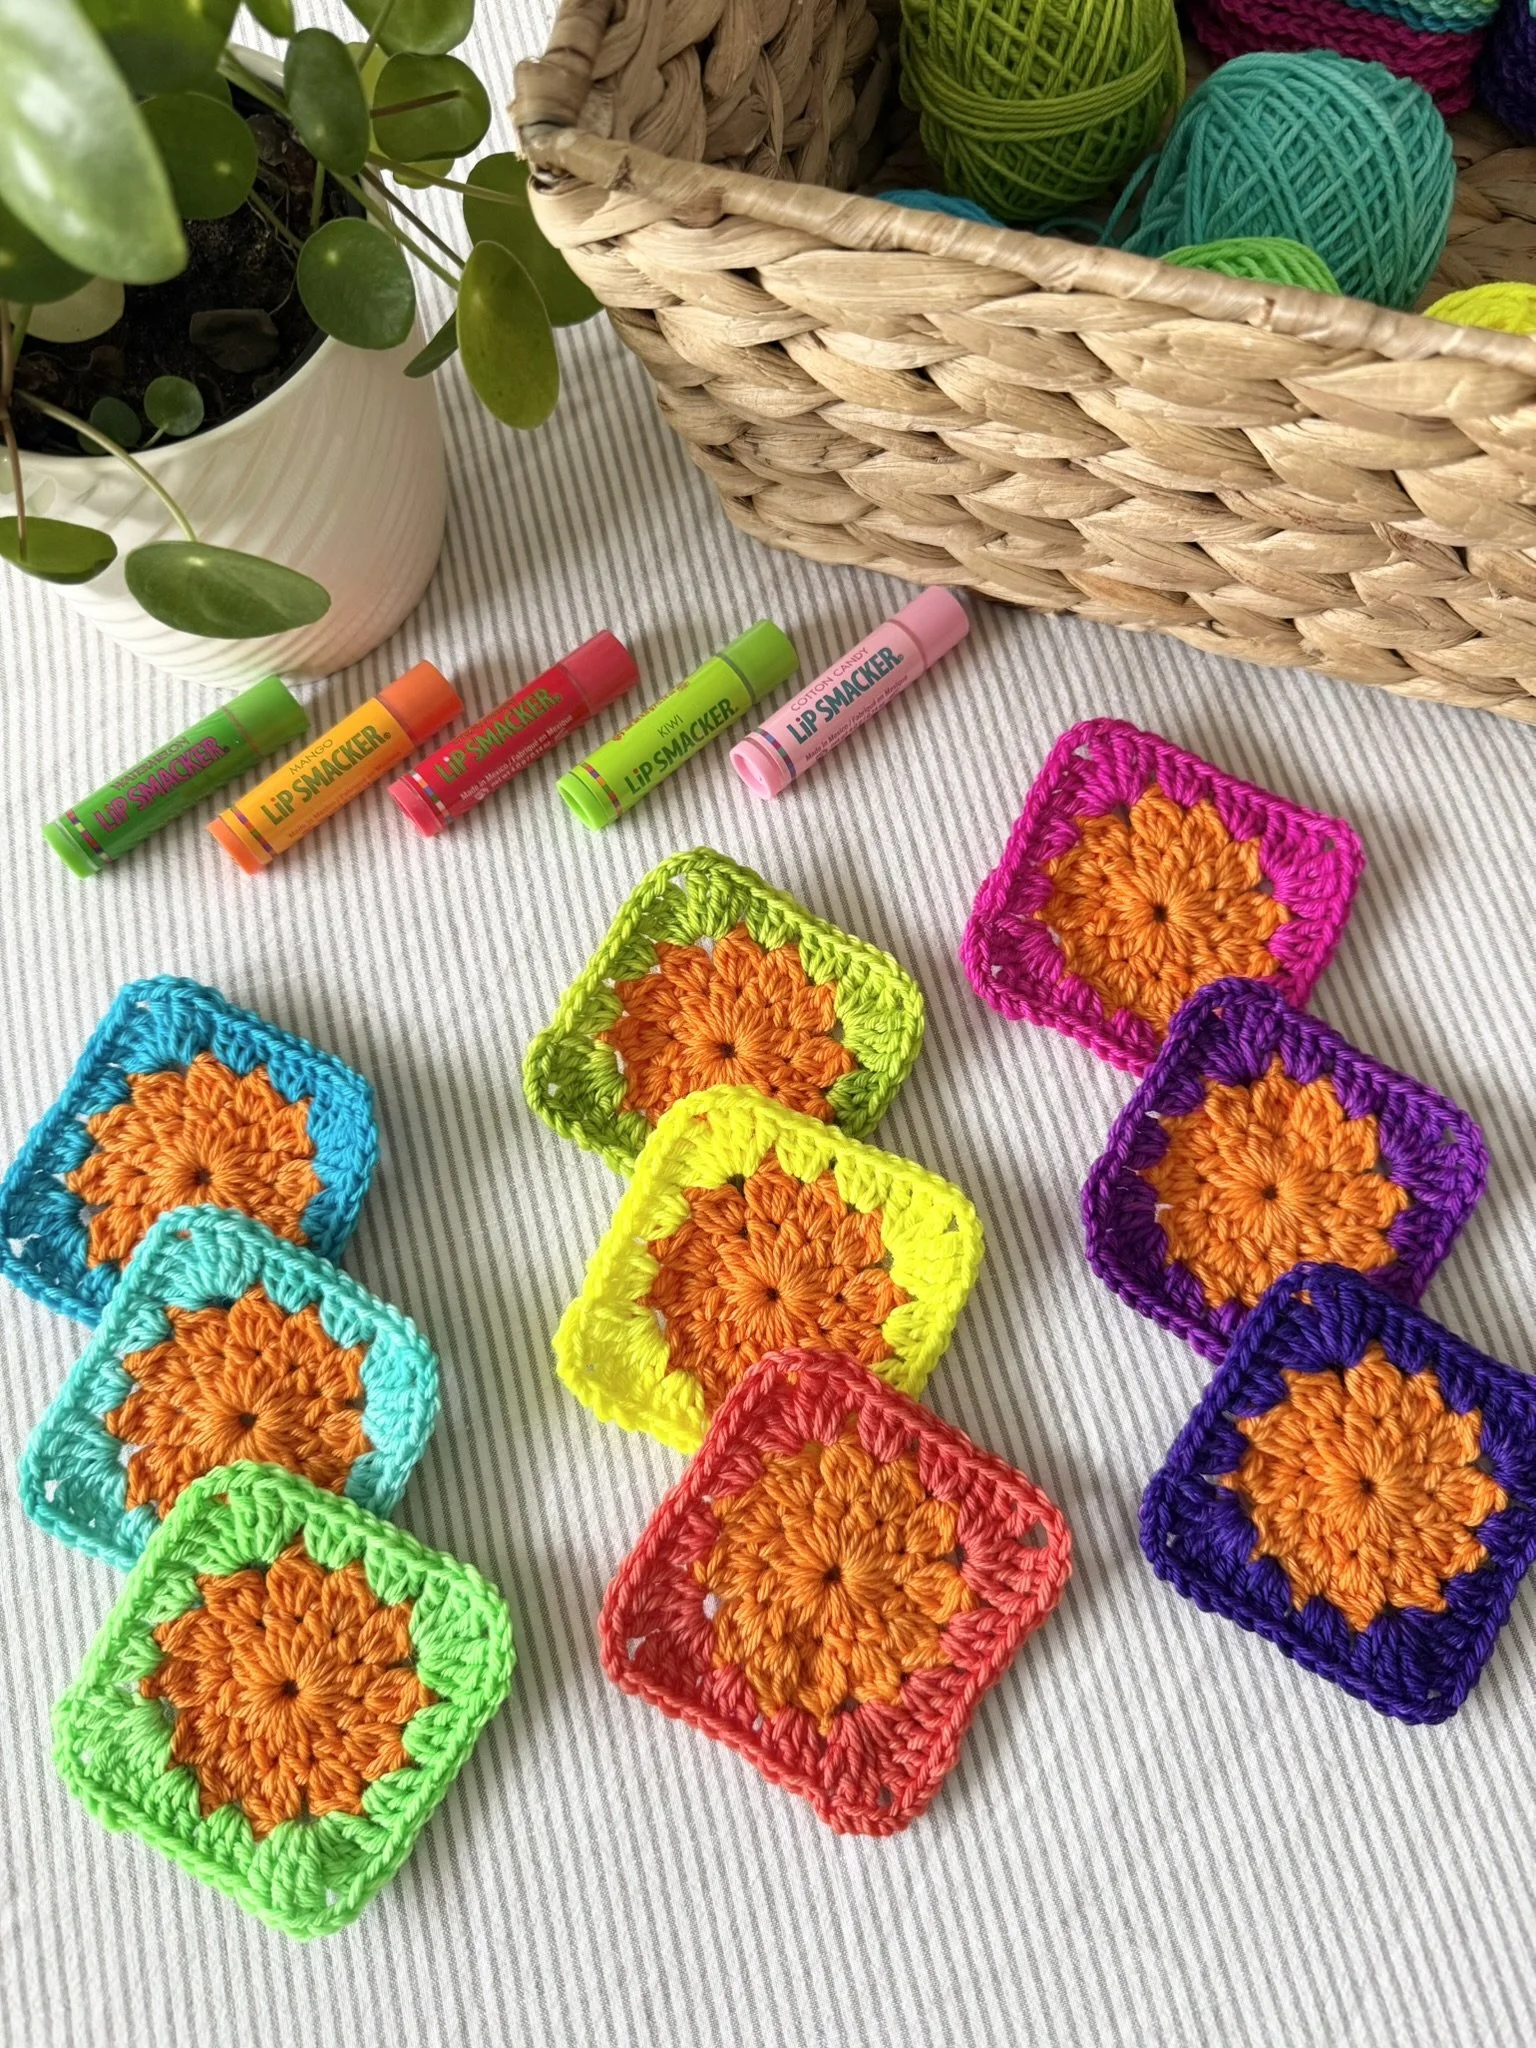
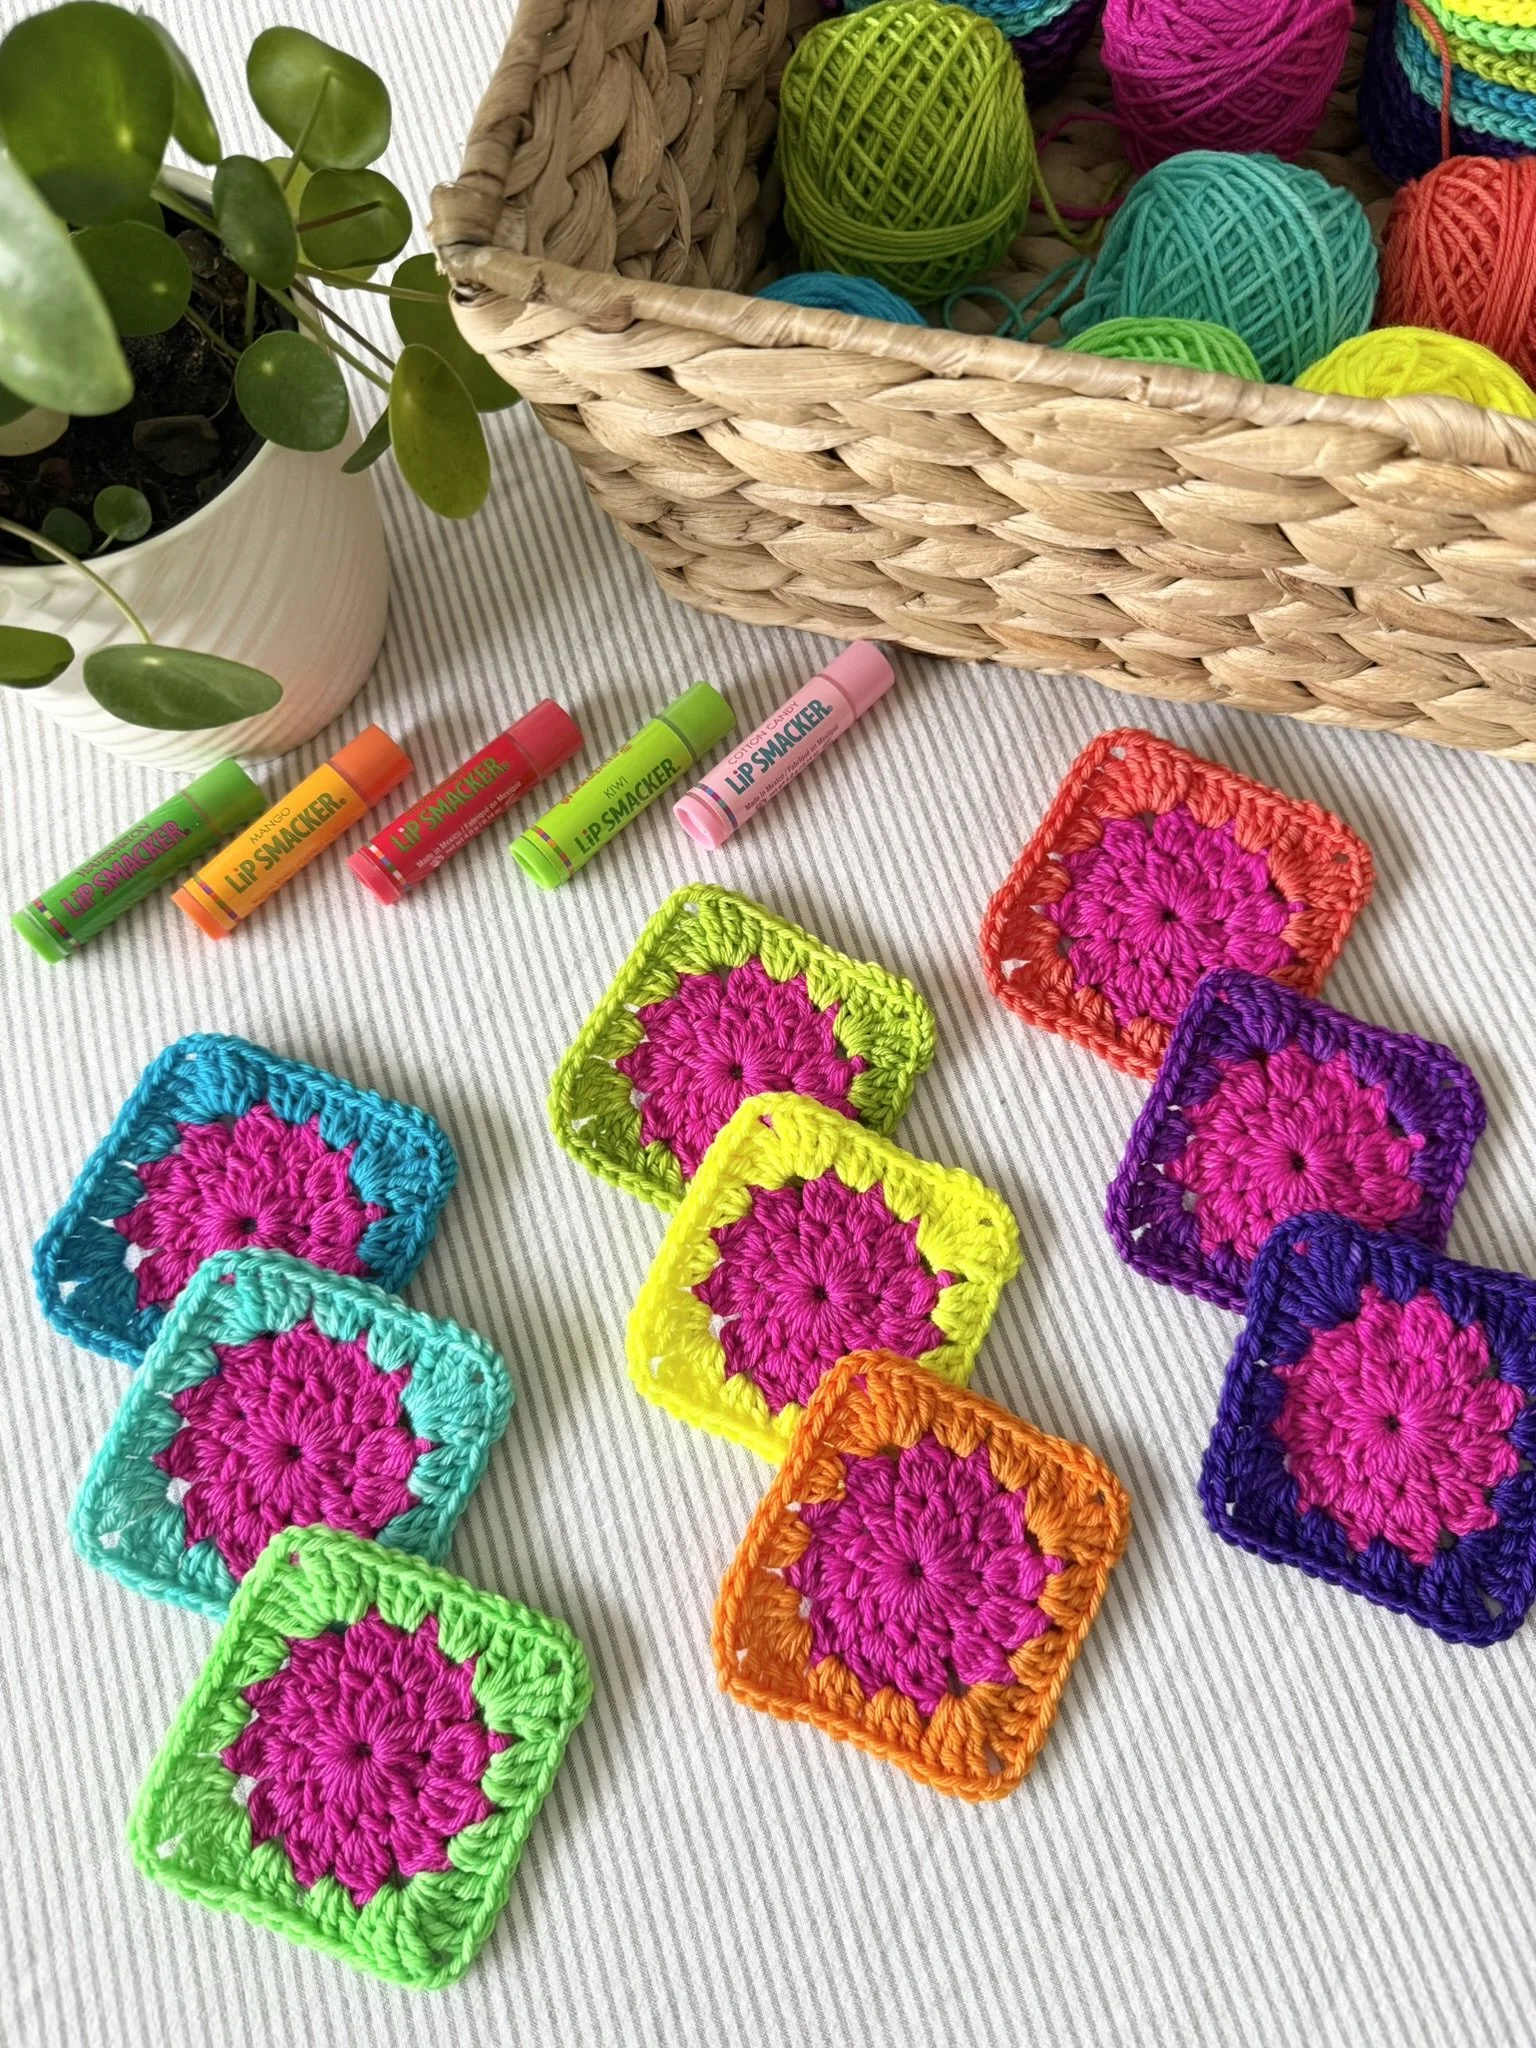
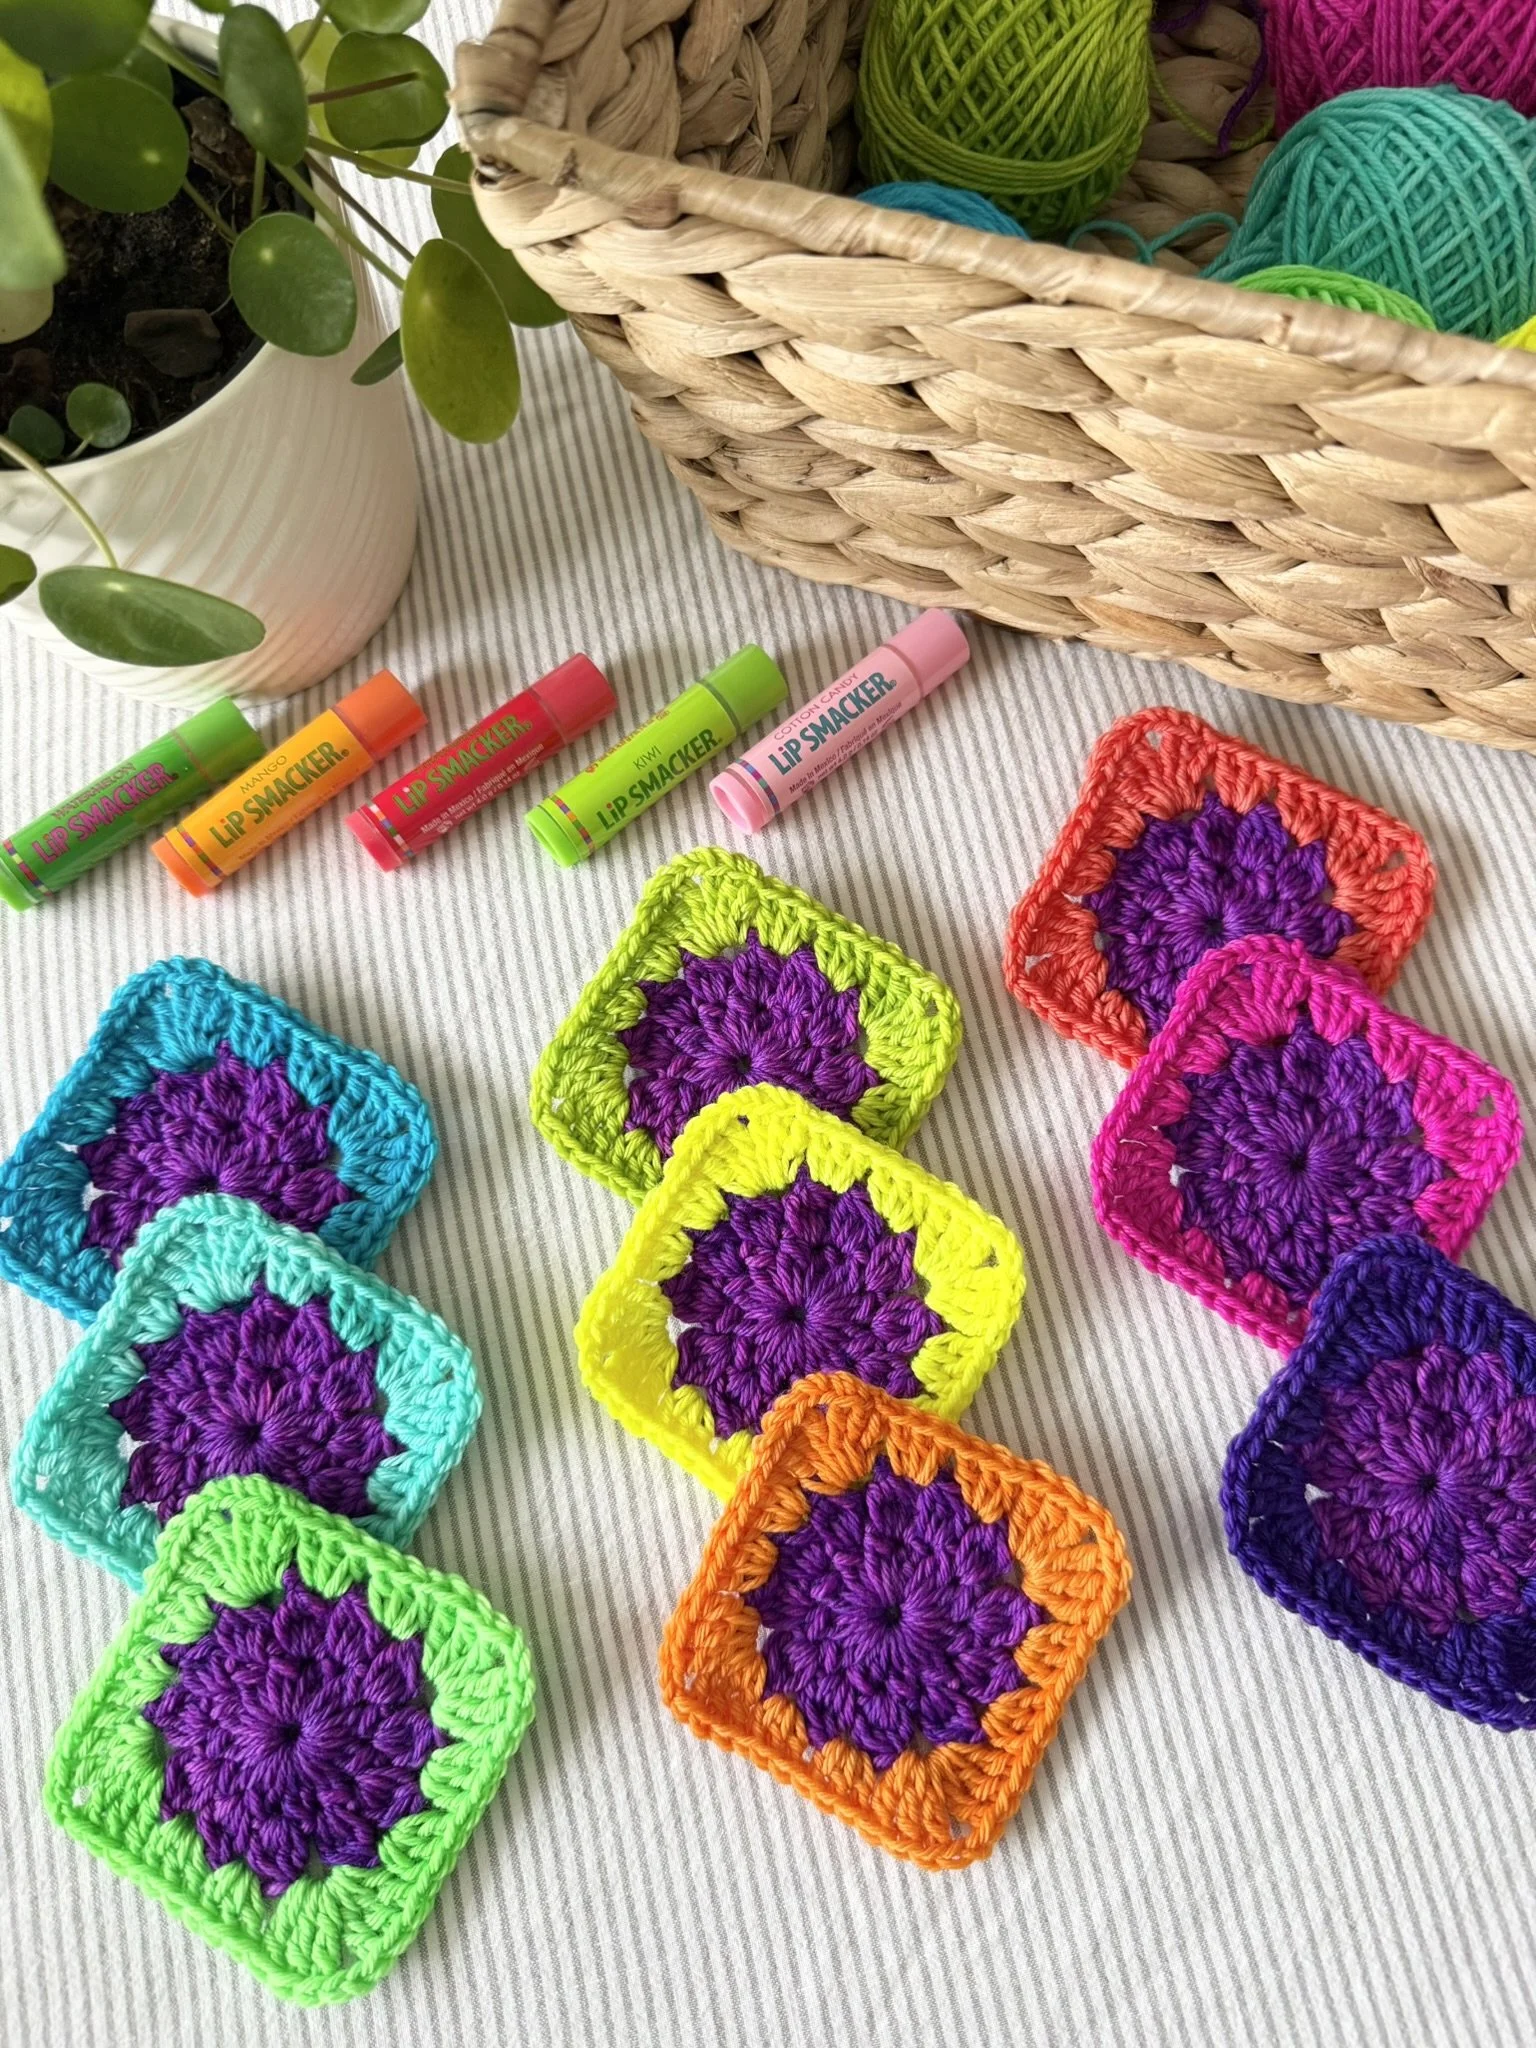
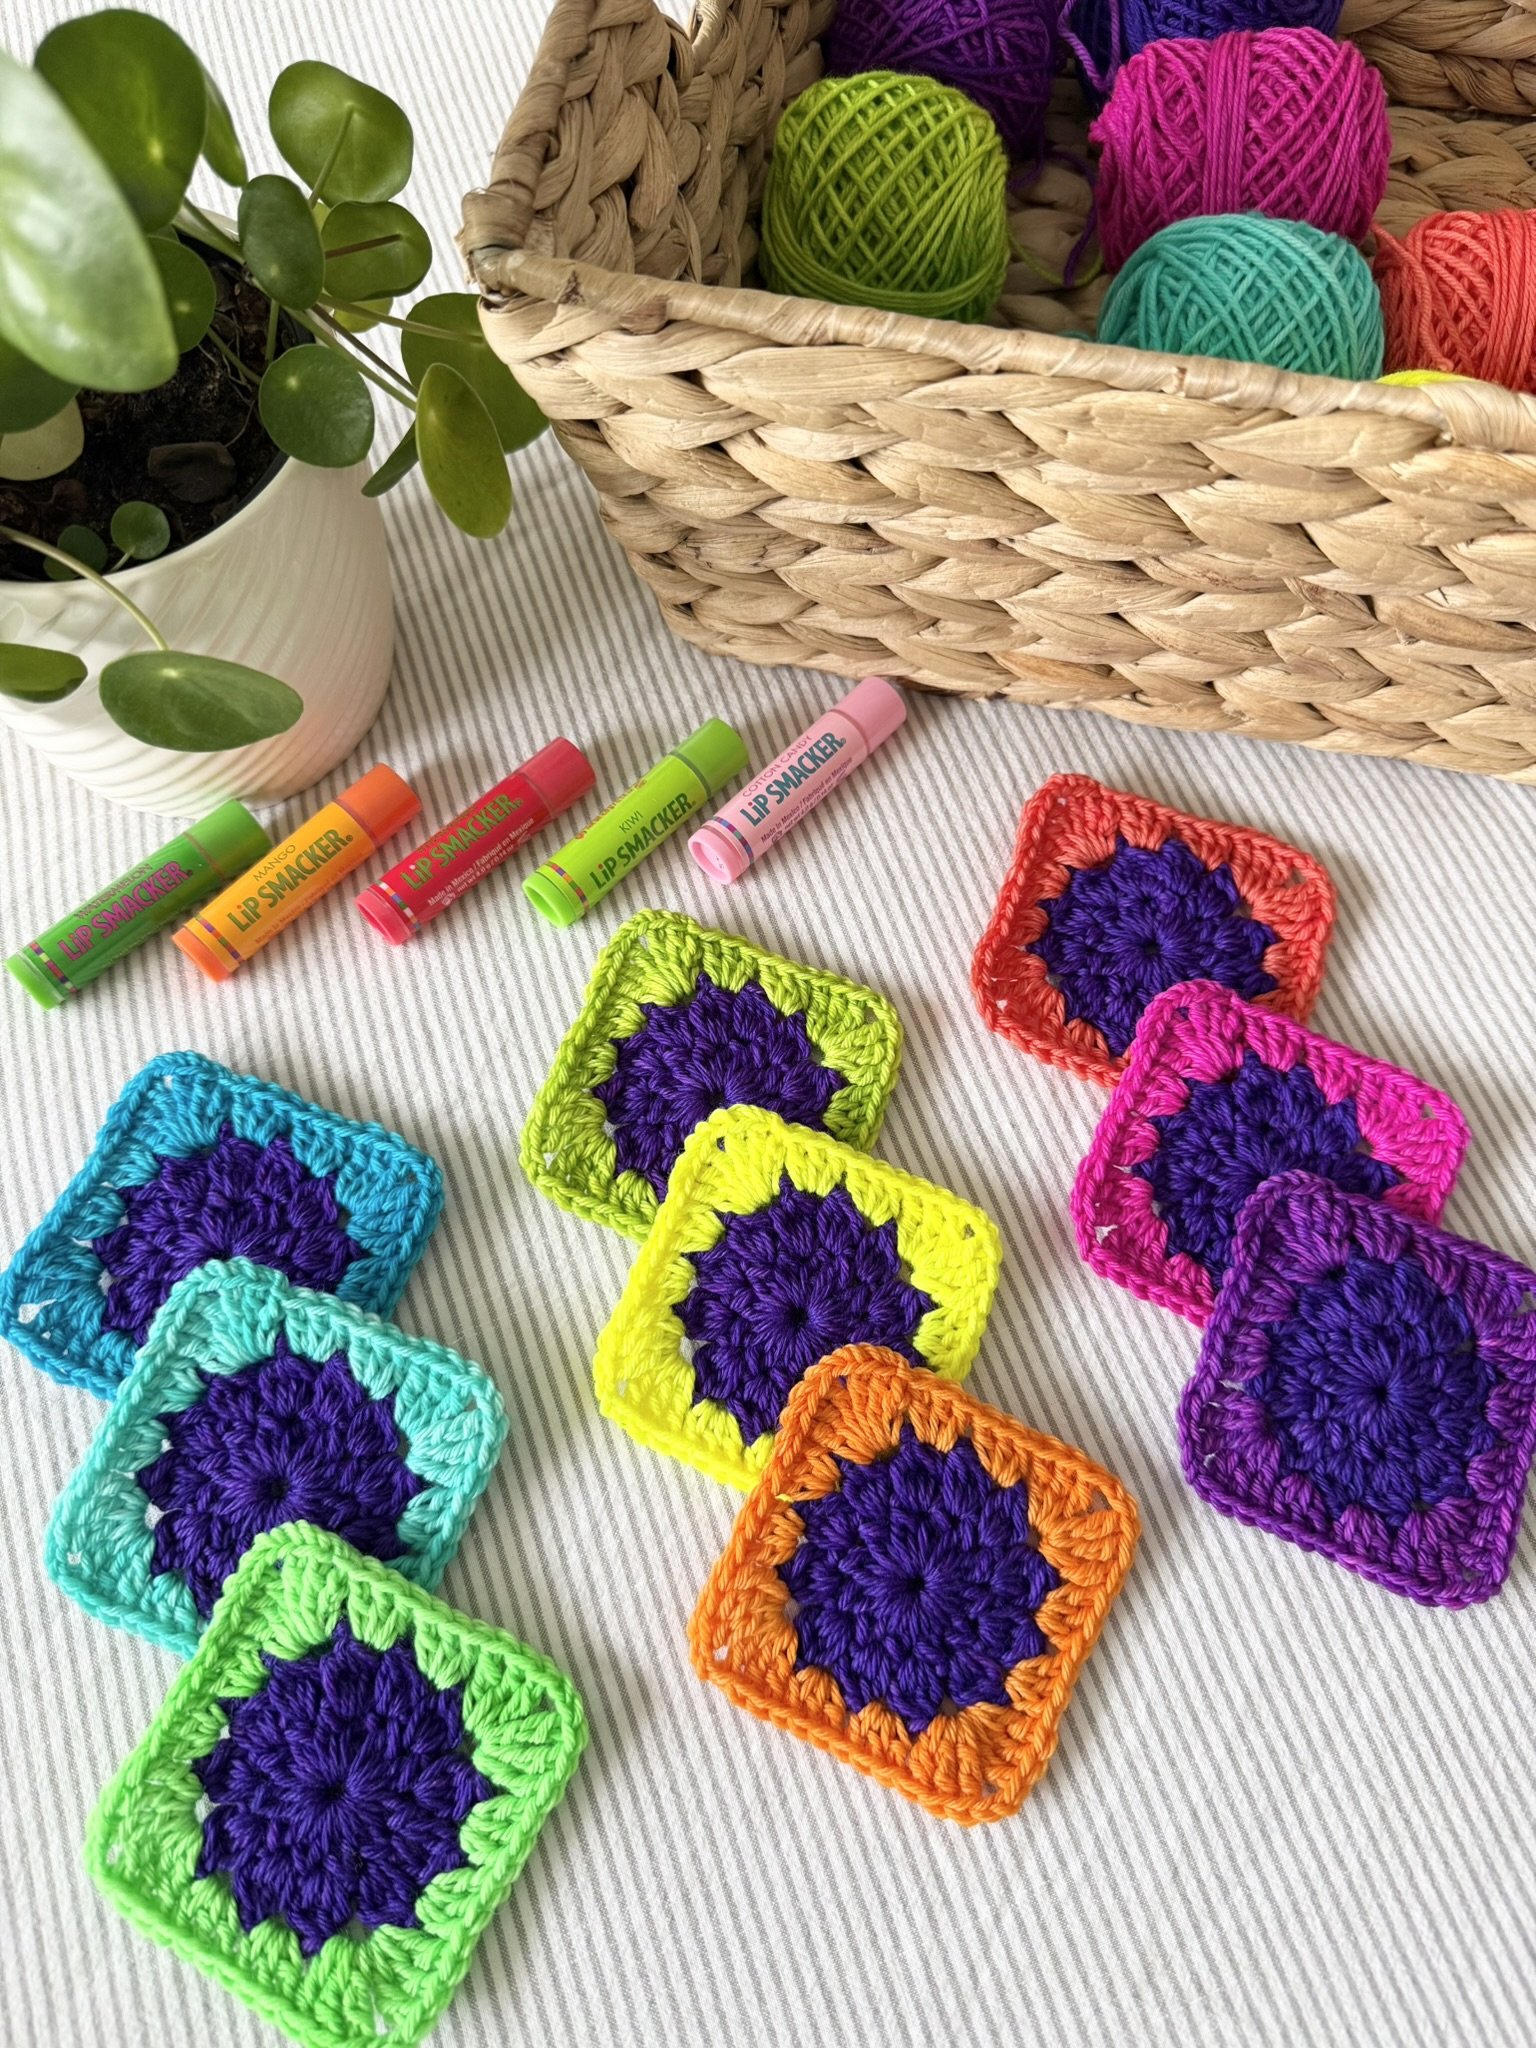
In the end, I went with my heart. I present to you the Nostalgia Starburst Blanket Pattern. Because, it’s nostalgic for me. As an 80’s millennial, this blanket reminds me of my entire childhood. Think camp, friendship bracelets (attached to your jeans with a safety pin, of course), making beaded flower bracelets at the cottage, scrunchies, butterfly hair clips, those Lip Smacker chap sticks…the list goes on and on. The joining colour on this blanket was WILD and I’d be lying if I said I didn’t have my doubts. But as I joined row after row, a warmth grew. It was JUST-SO-FUN!! Completely nostalgic, and the sweetest little dopamine hit.
I hope you love it!!!
Happy Crocheting Everyone :)
L, M
ps. If you want a printable PDF of this blanket pattern, you can find it here:
ETSY: Nostalgia Starburst Blanket Pattern
Ravelry: Nostalgia Starburst Blanket Pattern
Notions
US 4.5 mm crochet hook (size 7).
Needle for weaving in ends.
Scissors.
Yarn
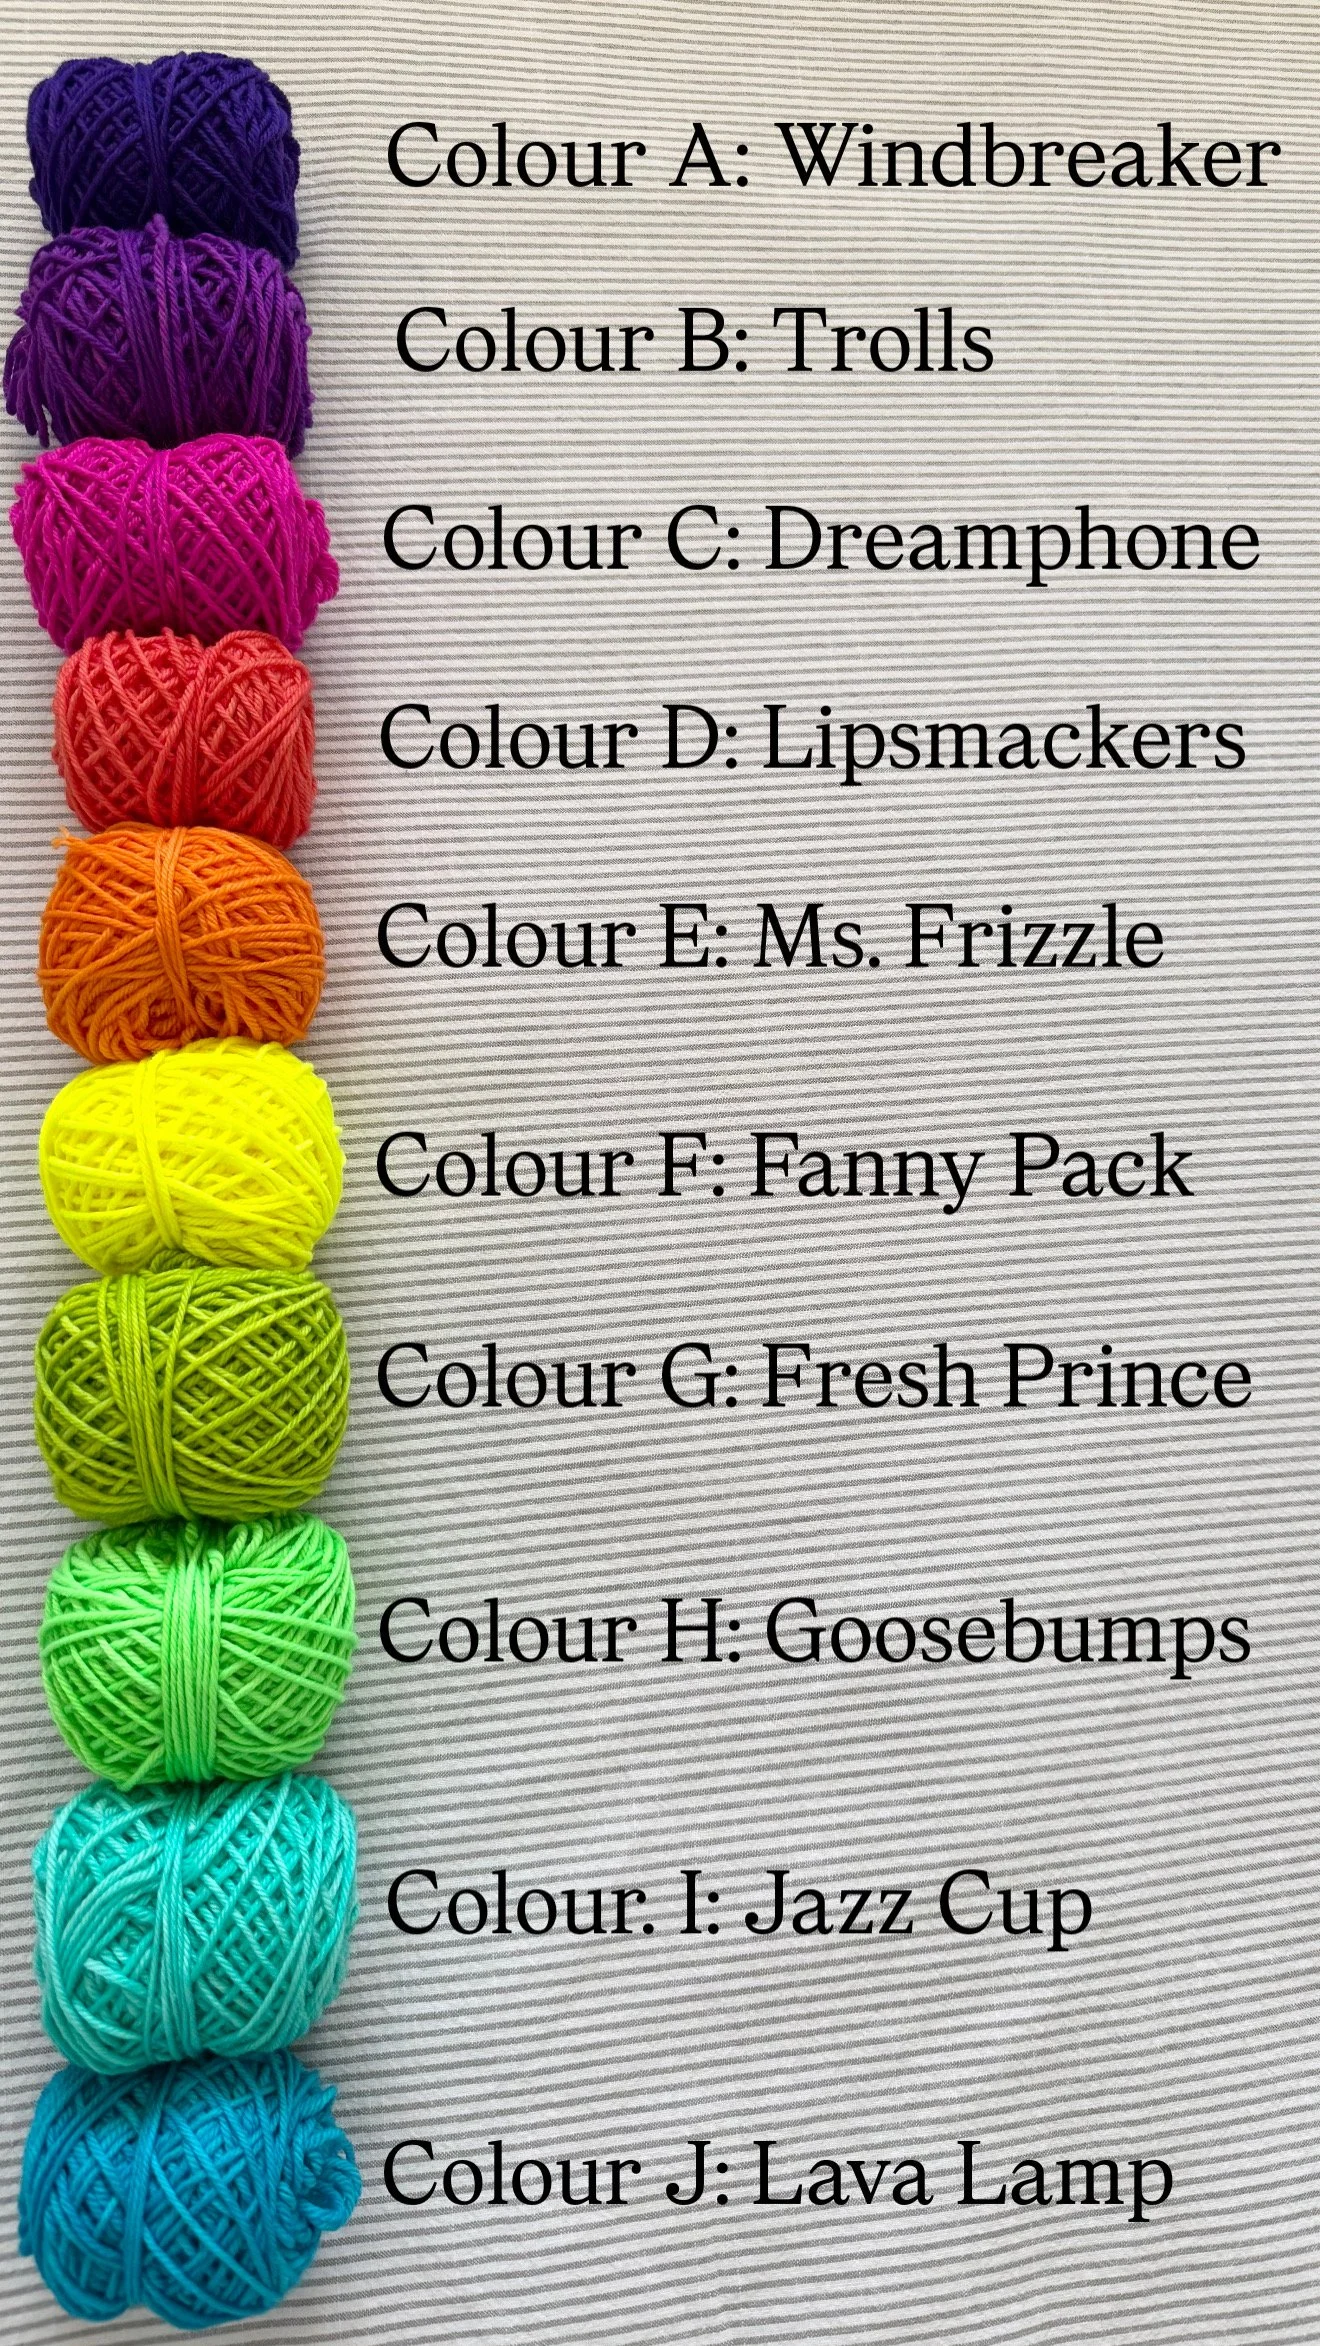
The Frosted Stitch, Millennial Collection, DK weight, 75/25% SW Merino/Nylon (246yds/100g):
Colour A: Windbreaker (187yds/76g) 1 skein
Colour B: Trolls (182yds/74g) 1 skein
Colour C: Dreamphone (187yds/76g) 1 skein
Colour D: Lipsmackers (204yds/83g) 1 skein
Colour E: Ms. Frizzle (189yds/77g) 1 skein
Colour F: Fanny Pack (187yds/80g) 1 skein
Colour G: Fresh Prince (182yds/74g) 1 skein
Colour H: Goosebumps (192yds/78g) 1 skein
Colour I: Jazz Cup (187yds/76g) 1 skein
Colour J: Lava Lamp (202yds/82g) 1 skein
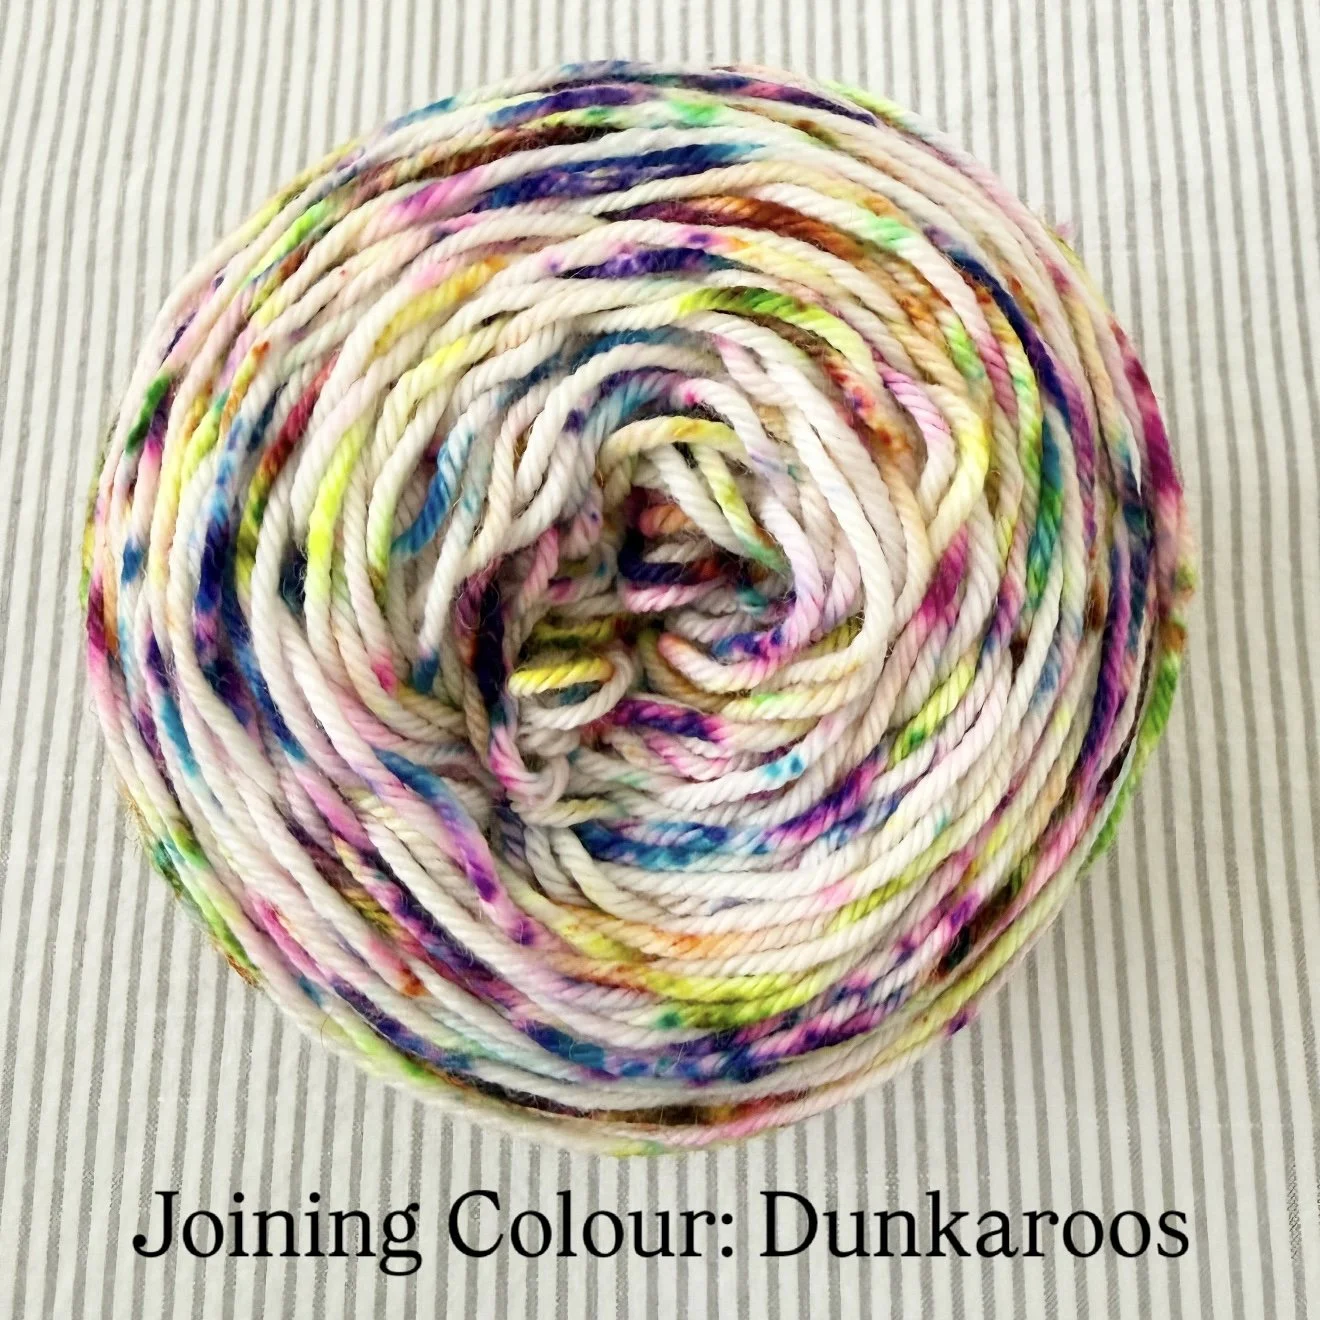
Joining Colour: Dunkaroos (1262yds/513g) 6 skeins
Alternative Yarn Recommendations & Links:
The Frost Stitch Millennial Collection Blanket Kit (10 colours + joining yarn)
Hue Loco Semisolids DK (100% SW merino)
WeCrochet Swish DK (100% SW merino)
WeCrochet CotLin (70% Tanguis Cotton, 30% Linen)
WeCrochet Brava Baby DK Yarn (100% Premium Acrylic)
WeCrochet Shine Sport Yarn (60% Pima Cotton, 40% Modal) **works up like a DK weight
WeCrochet Comfy Sport Yarn (75% Pima Cotton, 25% Acrylic) ** works up like a DK weight
WeCrochet Modish Merino Yarn (100% Extra Fine Merino Wool Easy Wash)
Berroco Vintage DK (52% Acrylic, 40% Wool, 8% Nylon)
Paintbox Yarns Simply DK (100% Acrylic)
Hayfield Bonus DK (100% Acrylic)
Gauge
4 rnd starburst granny square:
- 3.25” (unblocked)
- 4” joined with CJAYG (unblocked)
Finished Size
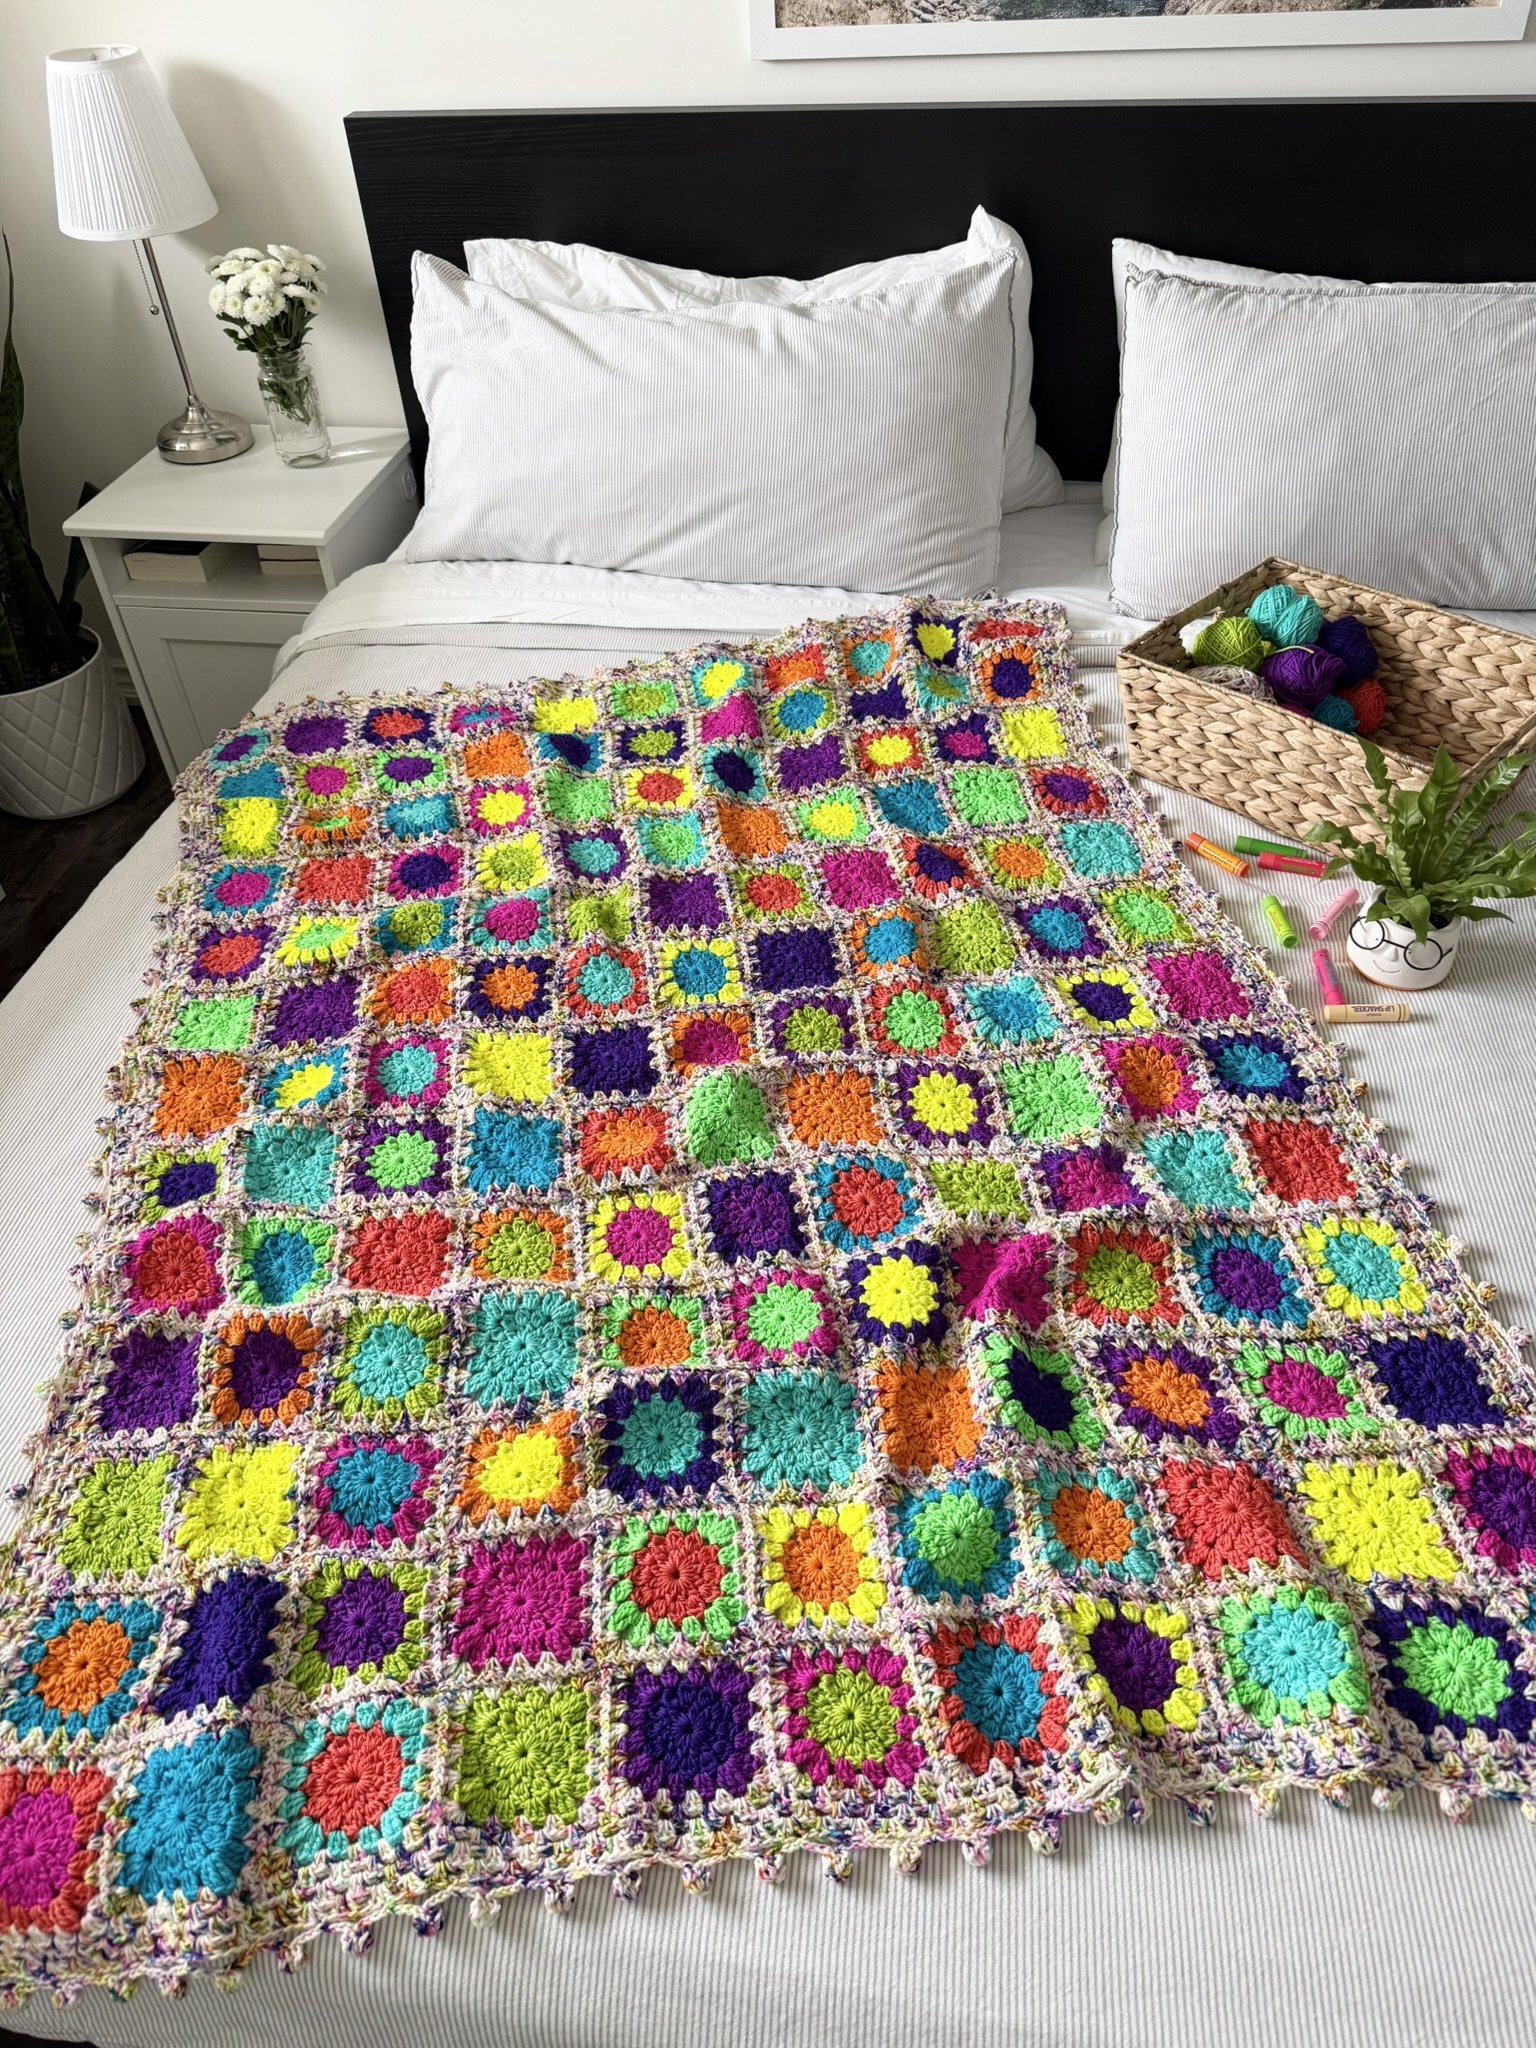
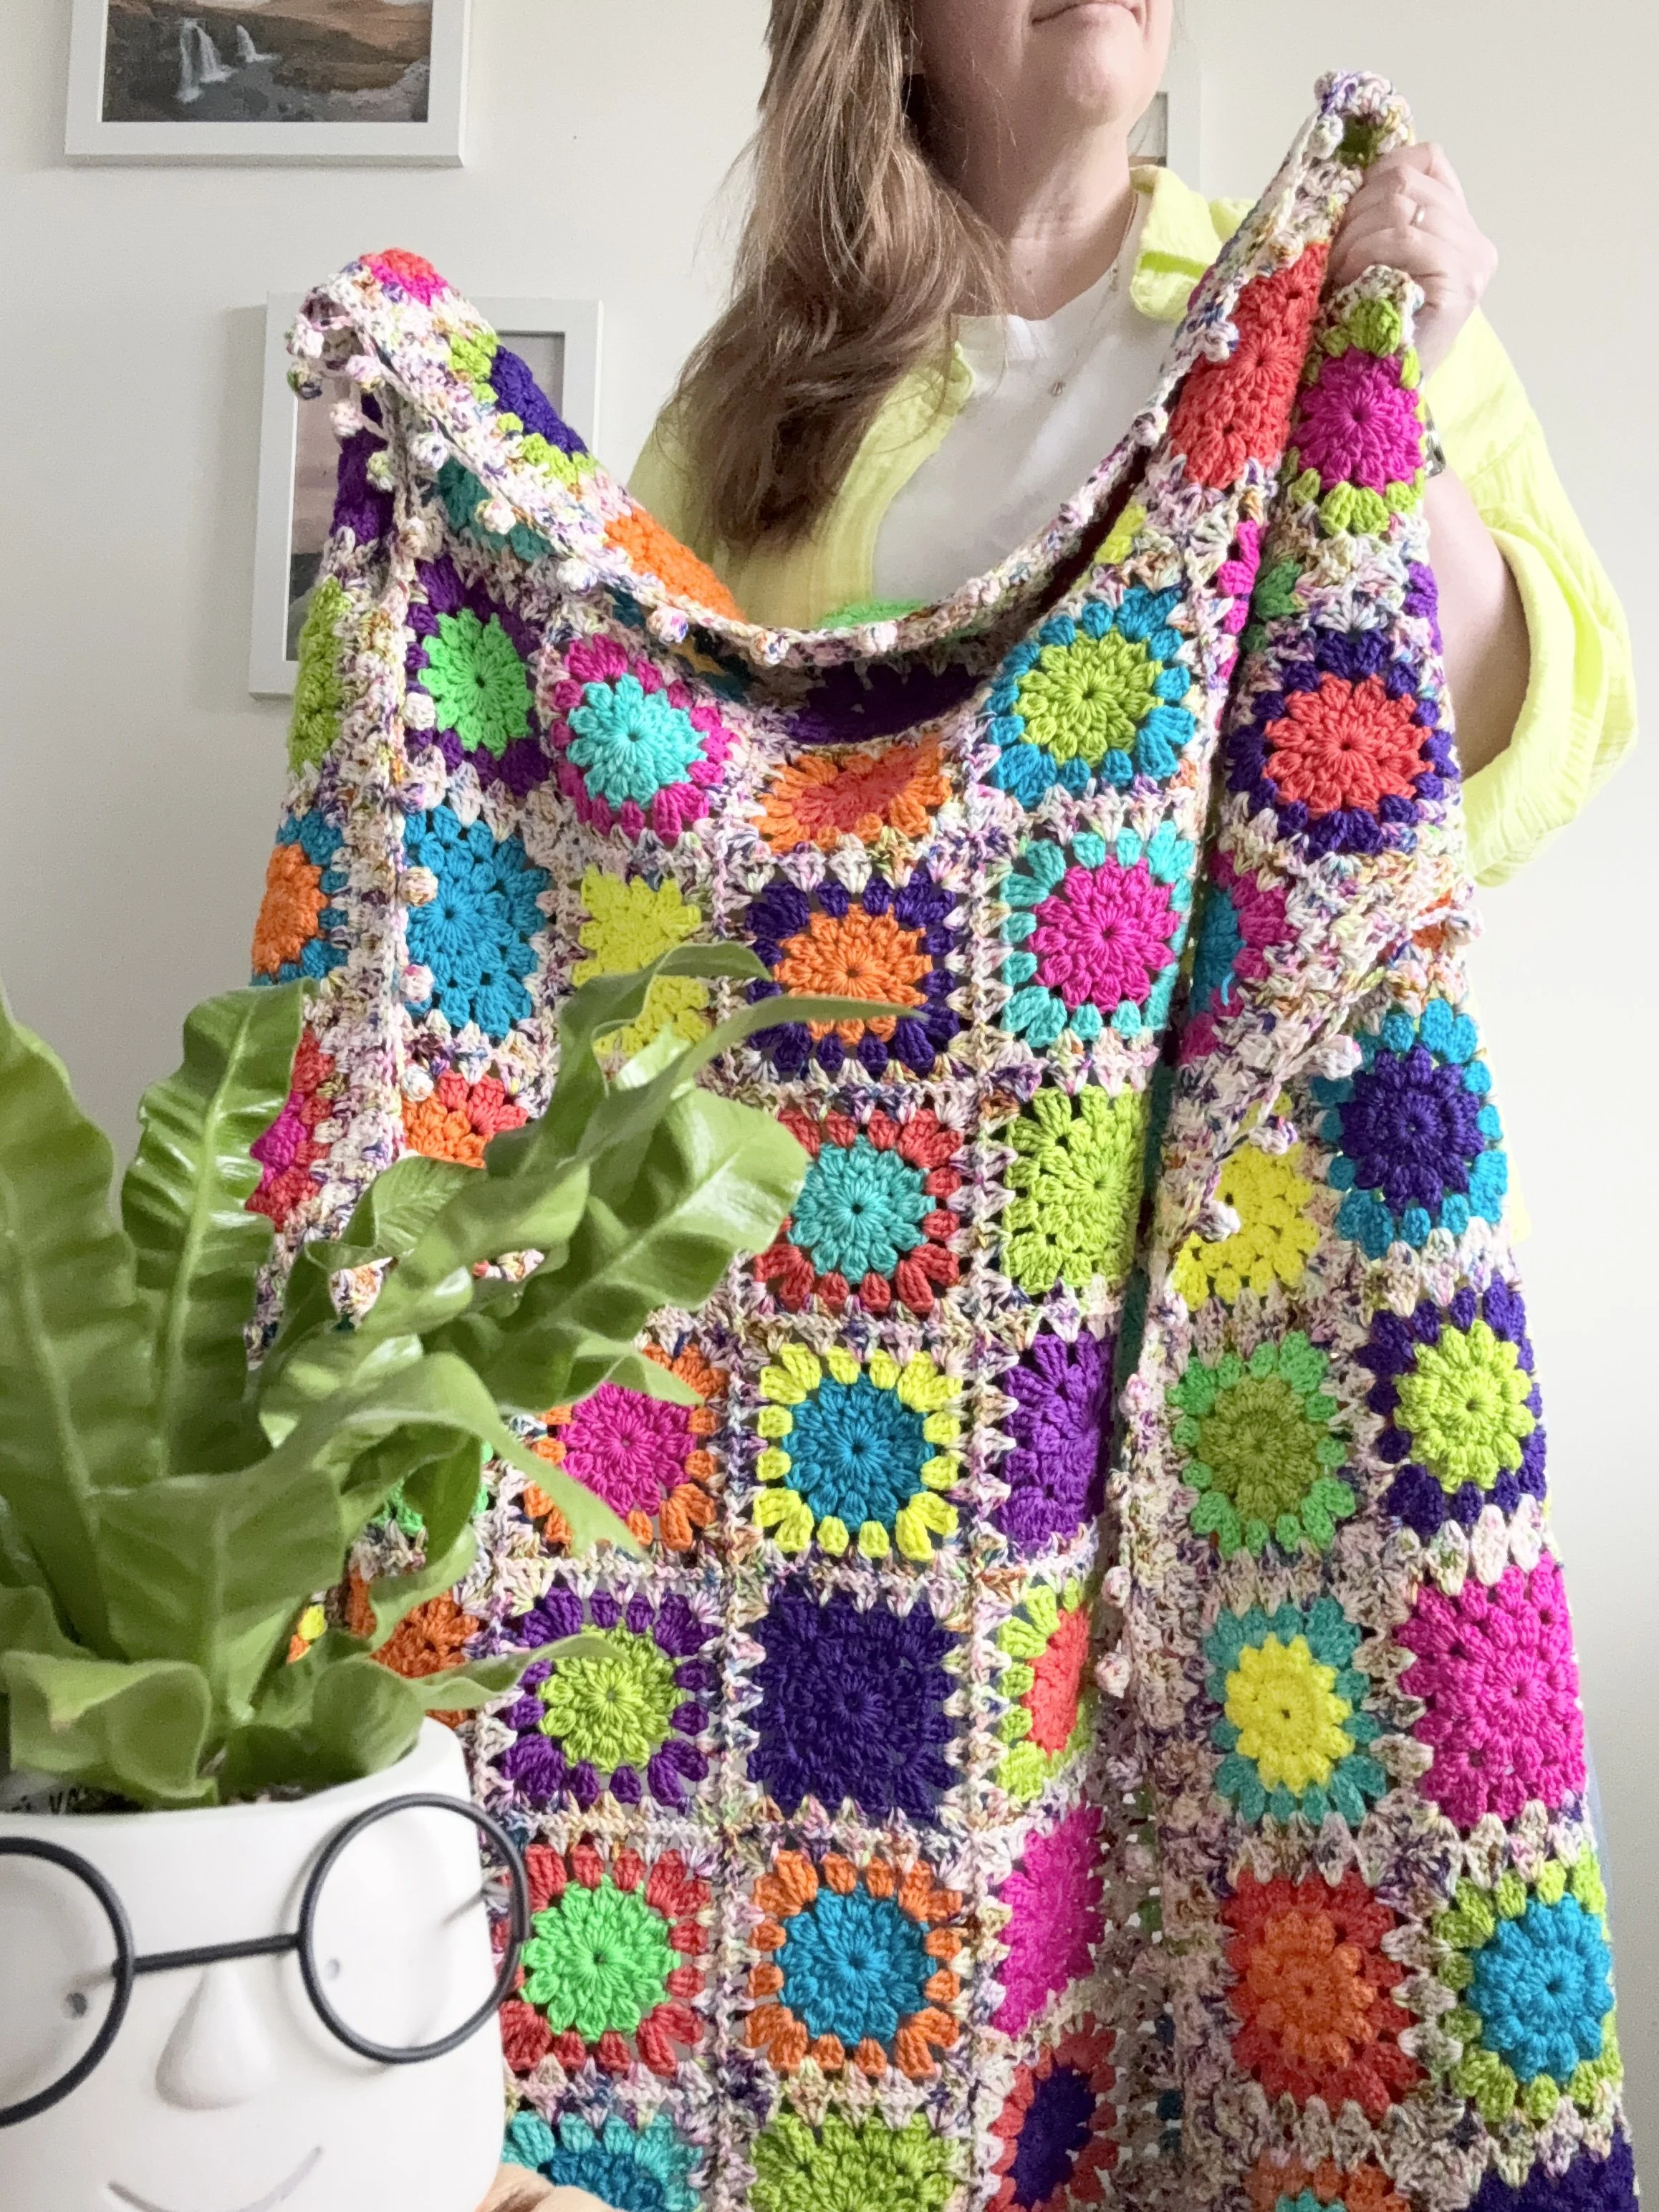
46” x 61” inches (blocked)
Glossary (using US Crochet Terminology)
st(s)- stitch(es)
ch- chain
ch-sp- chain space
sl st- slip stitch
YO- yarn over
rnd- round
cl st(s)- cluster stitch(es)
SC- single crochet
DC- double crochet
CJAYG- continuous join as you go
2 DC cl – 2 double crochet cluster stitch
4 DC cl- 4 double crochet cluster stitch
RS- right side
How to 2 DC cl: YO and insert hook into center of circle, YO and pull up a loop, YO and pull through 2. Repeat one more time. YO and pull through 3 loops on hook, Ch 1.
How to 4 DC cl: YO and insert hook into sp, YO and pull up a loop, YO and pull through 2. Repeat this 3 more times. There should be 5 loops on the hook. YO and pull through all 5 loops.
Pattern Notes
Gauge will affect yarn quantities, please adjust hook size to meet gauge. To ensure you meet the gauge listed on Page 1 of the pattern, please leave only a 4” starting tail, 4” ending tail. If your squares are bigger than the gauge listed on Page 1, then YOU WILL RUN OUT OF YARN. Go down in hook size (as many as needed!!) if your squares are too big. It will not affect the overall size of your scarf but will ensure you have enough yarn to finish your project. It is not the responsibility of the yarn dyer to provide you with more yarn to finish your advent scarf if you run out. Gauge is IMPORTANT.
Ch 2 counts as DC throughout.
In some cases, the video tutorials have been used for other patterns. Please follow the yarn recommendations, hook size and stitch counts in the written pattern- the videos are only meant as visual guides.
***While I have tried my best to capture the true colours of this yarn (white room, natural lighting), please note that each screen varies. For another perspective on these colorways, please see the blanket listing at The Frosted Stitch.
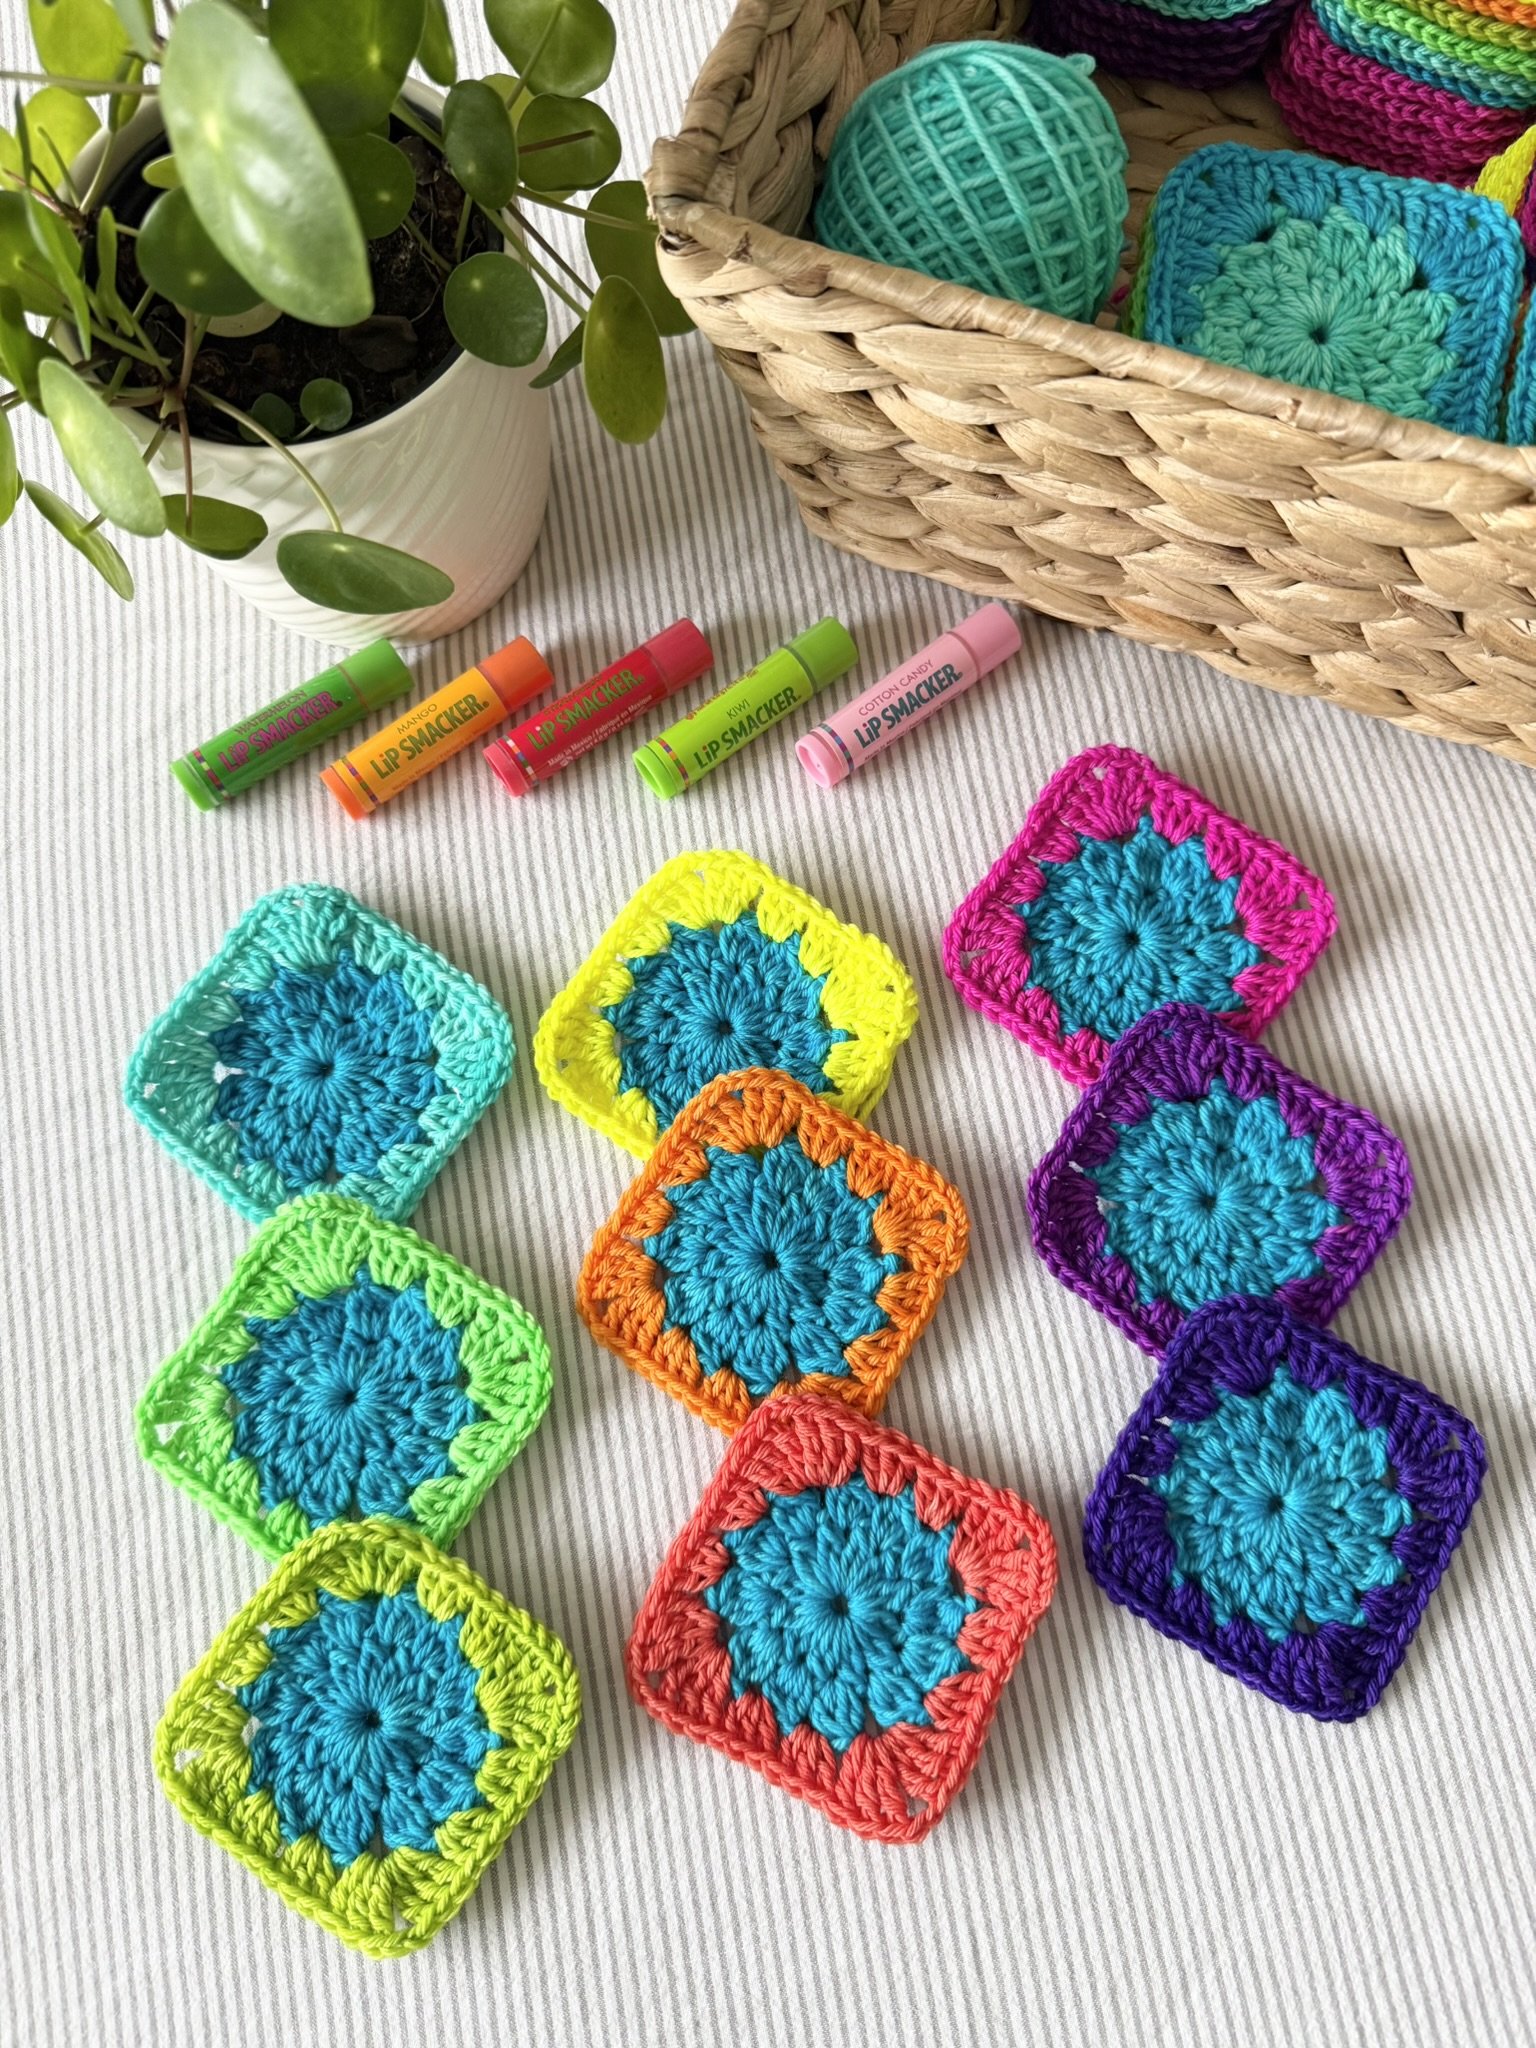
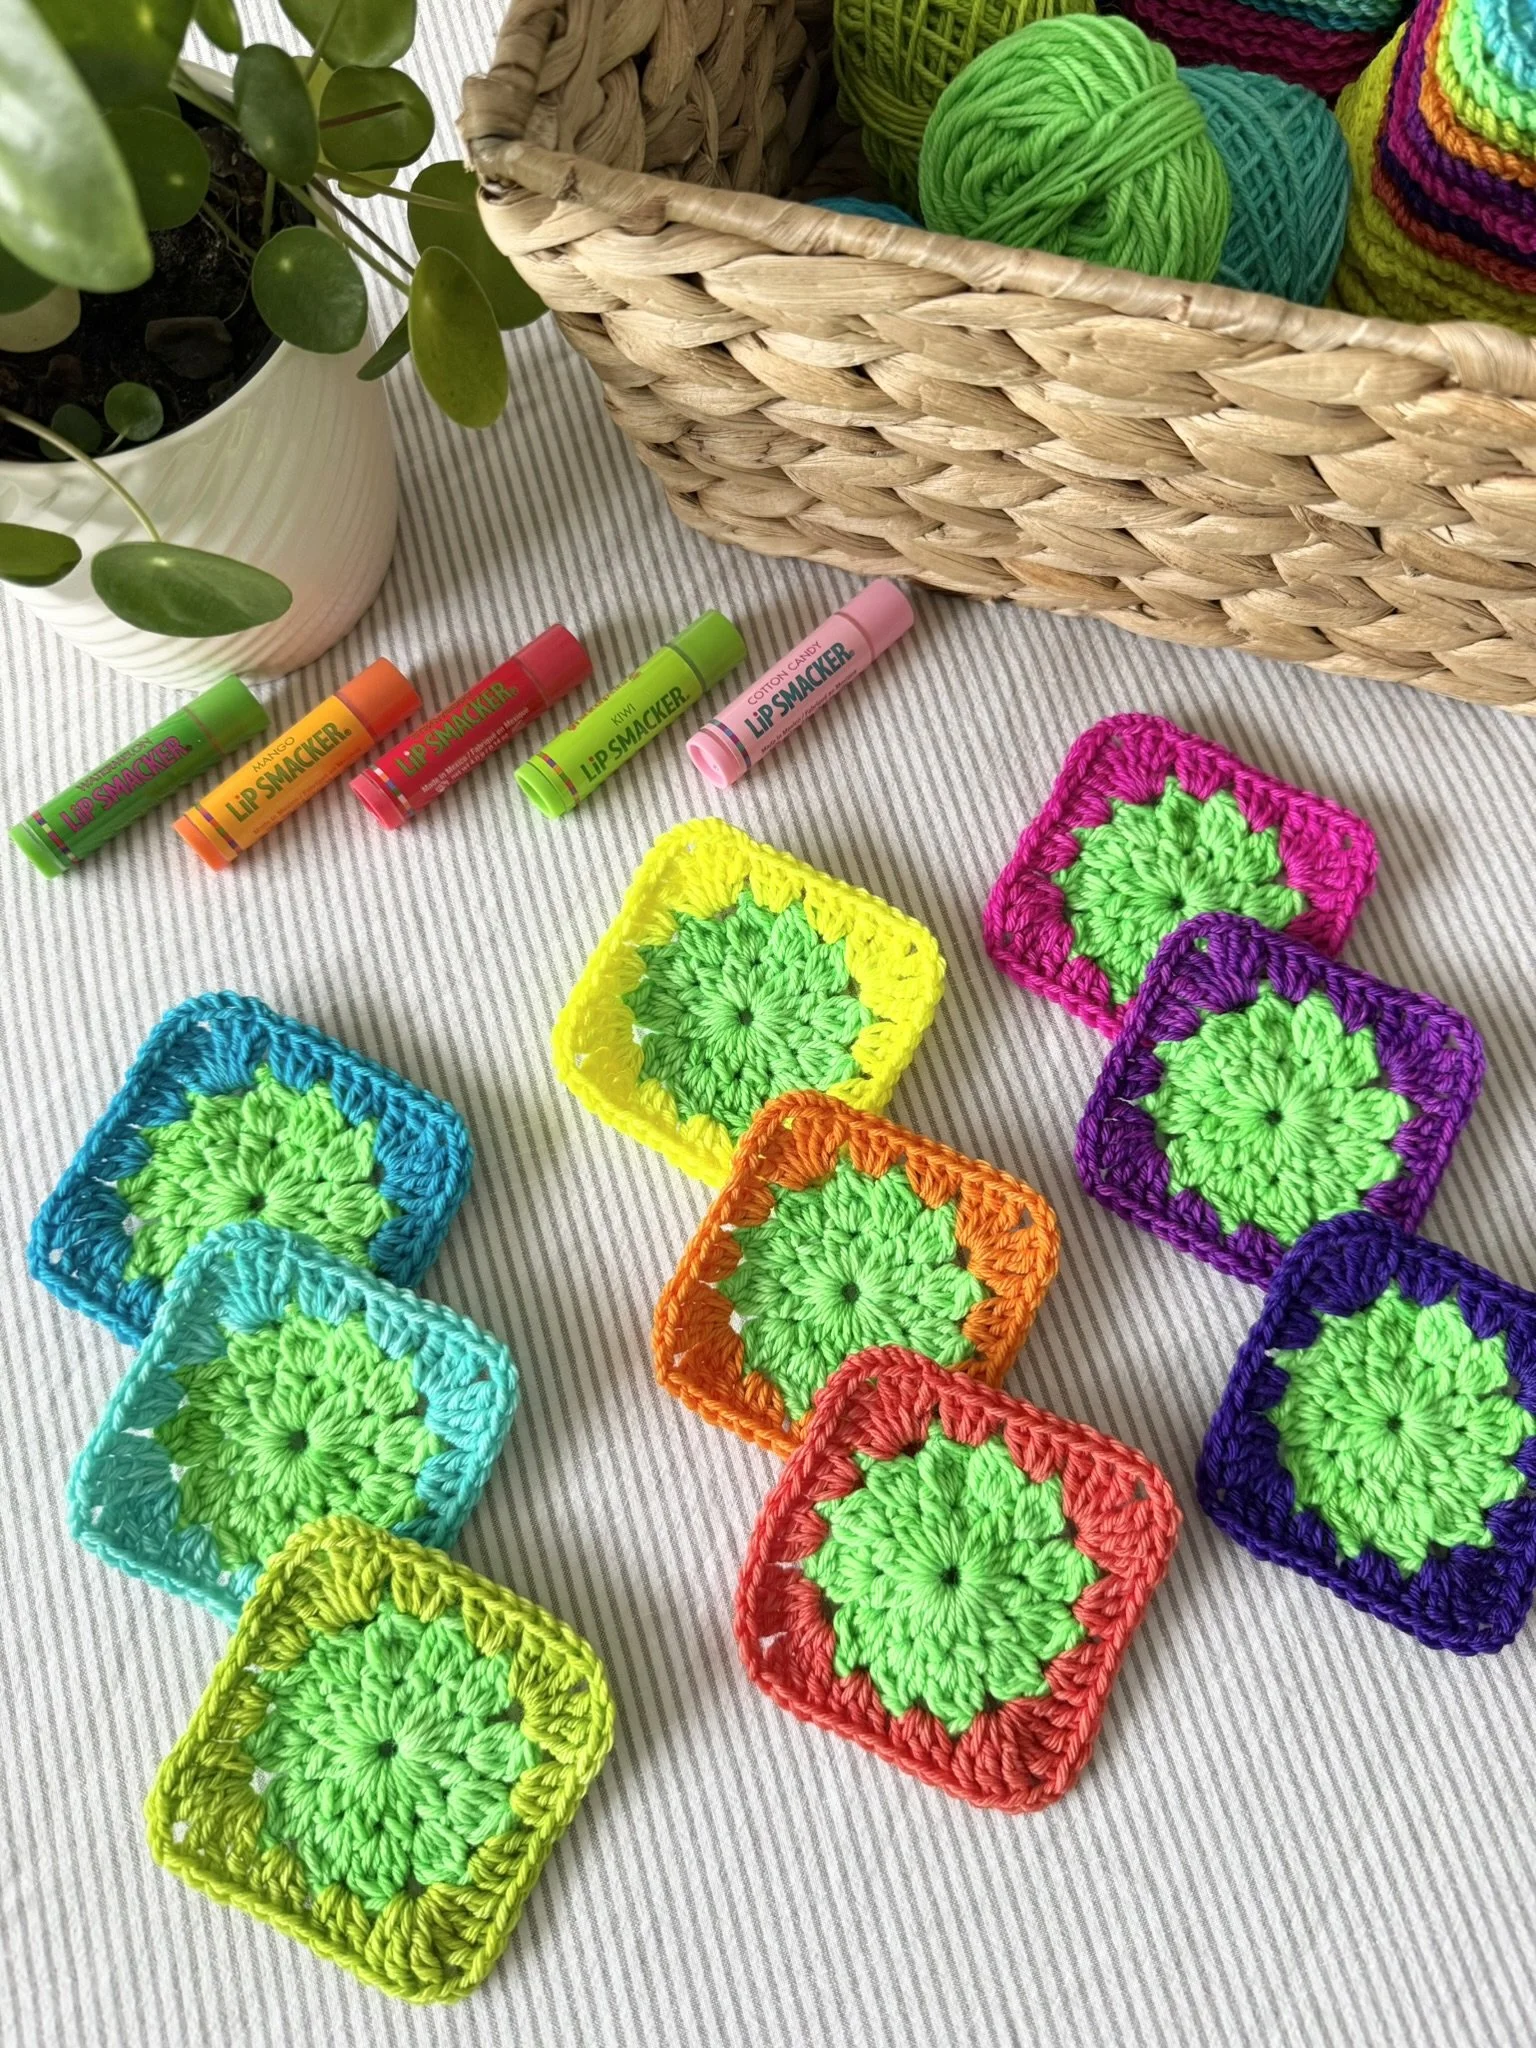
I recommend washing/blocking squares before joining this particular blanket. The colours are very saturated, and I’d be wary of the darker neons transferring to the lighter squares.
The Colour Legend is my attempt to provide you with photos that you can use if you’d like to find an alternative yarn. The pattern is written up recipe style so anyone can use any DK weight yarn to complete their project.
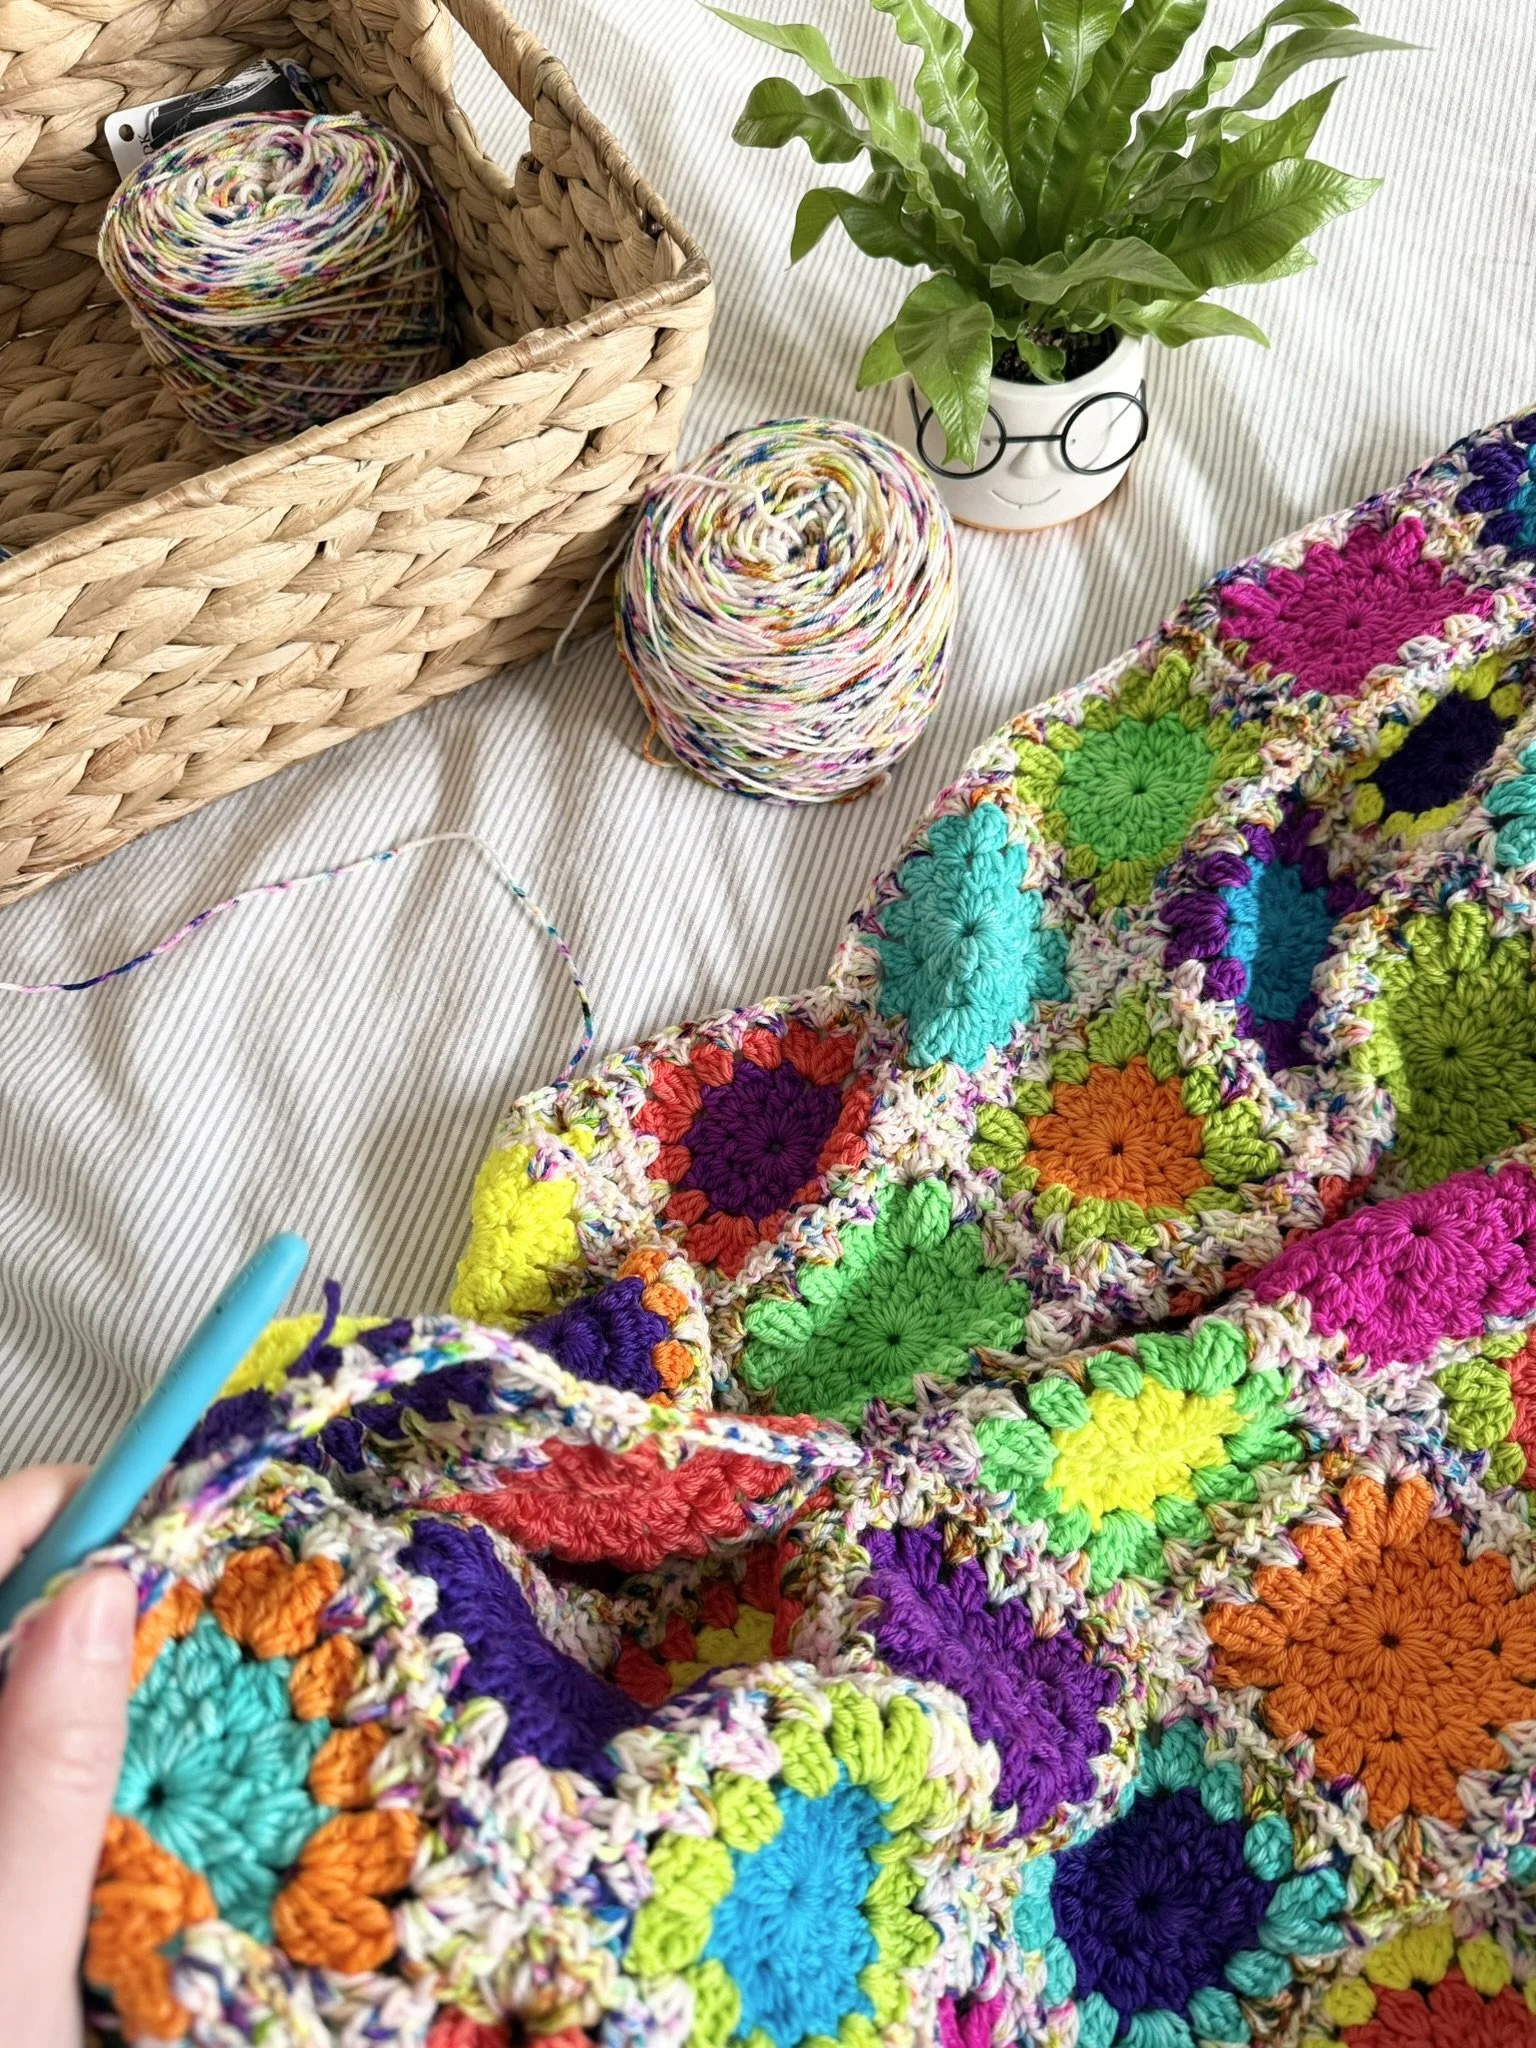
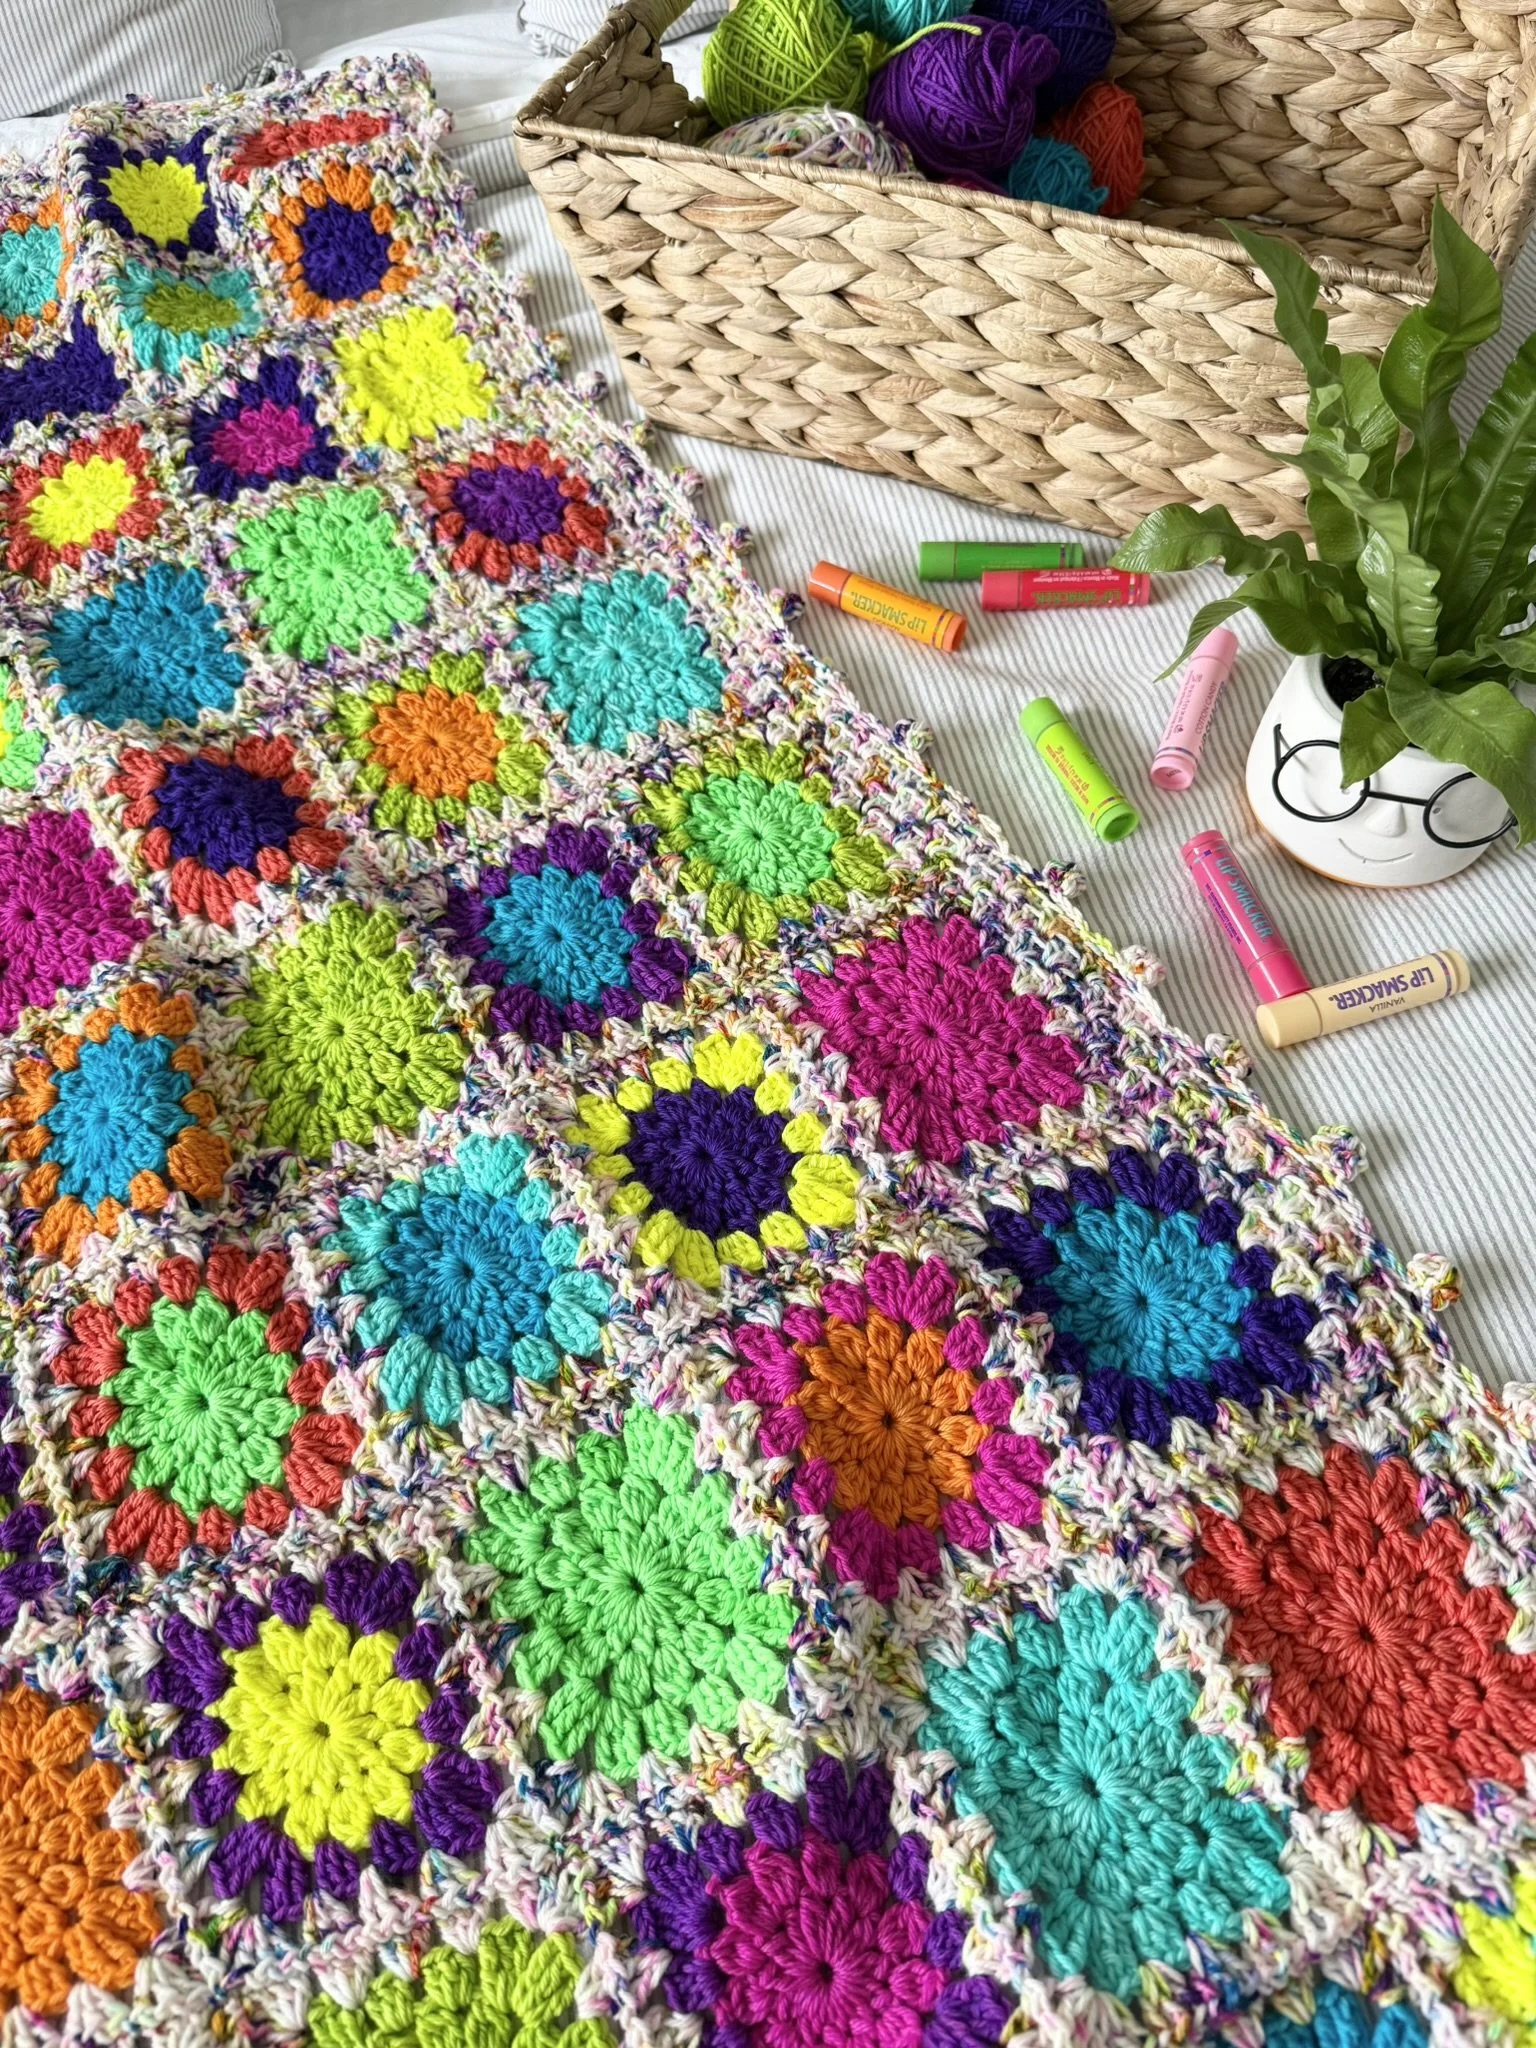
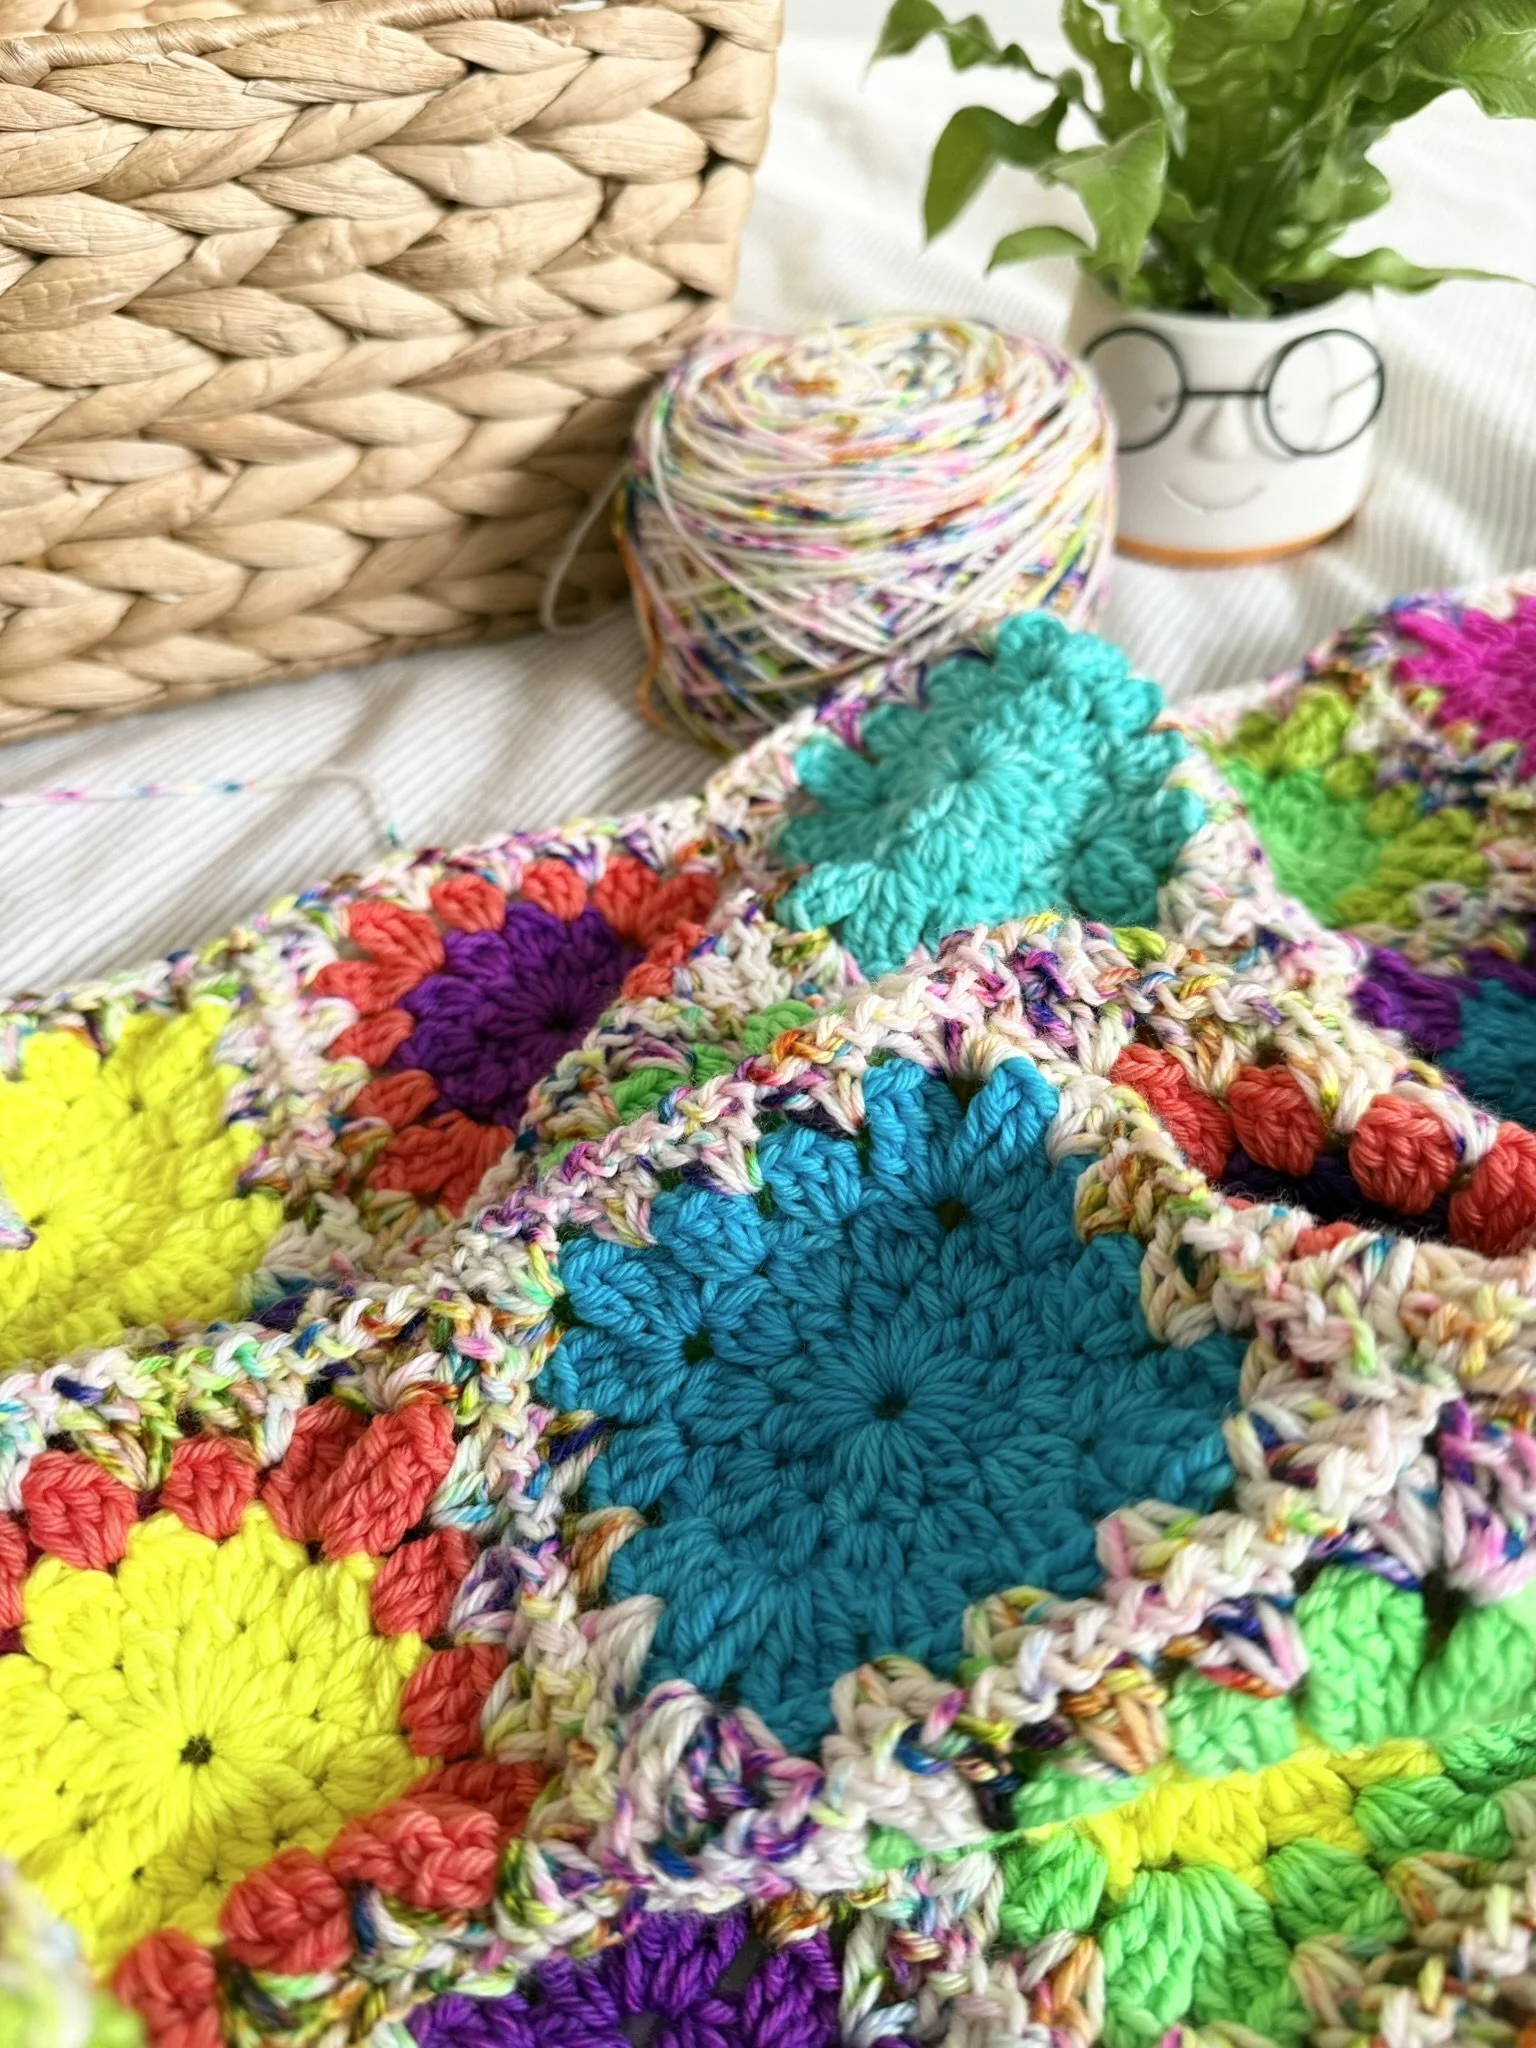
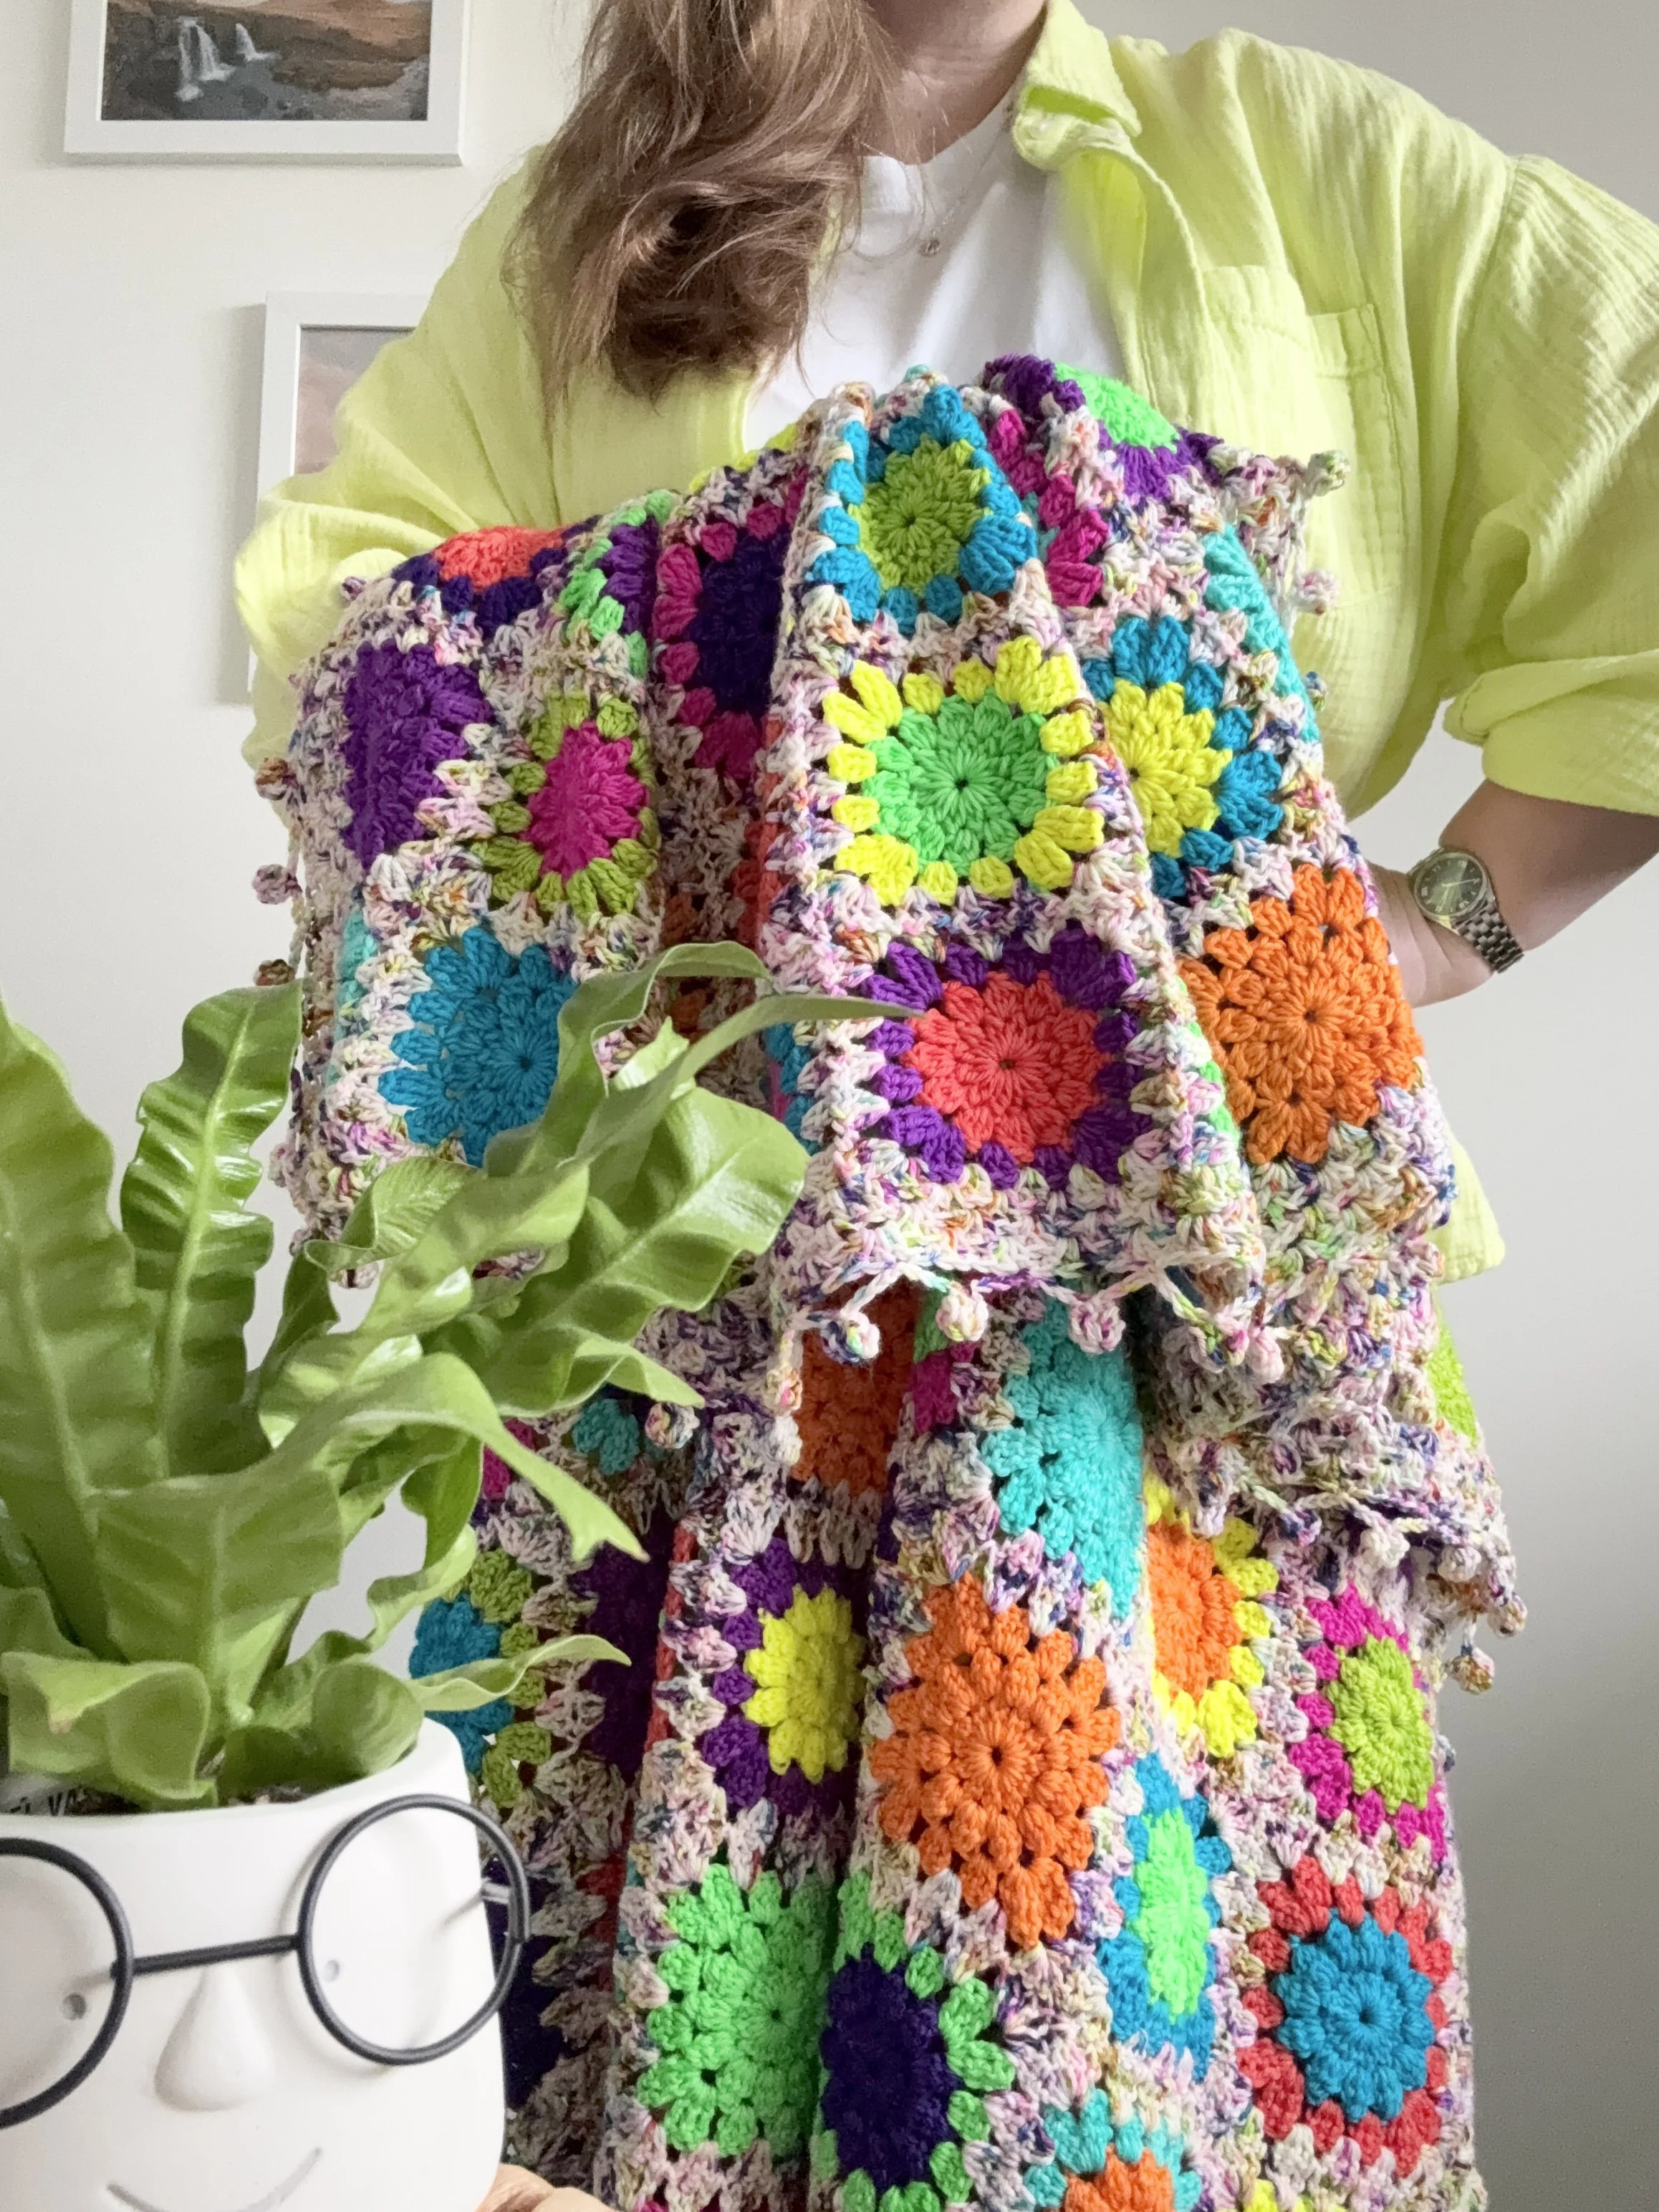
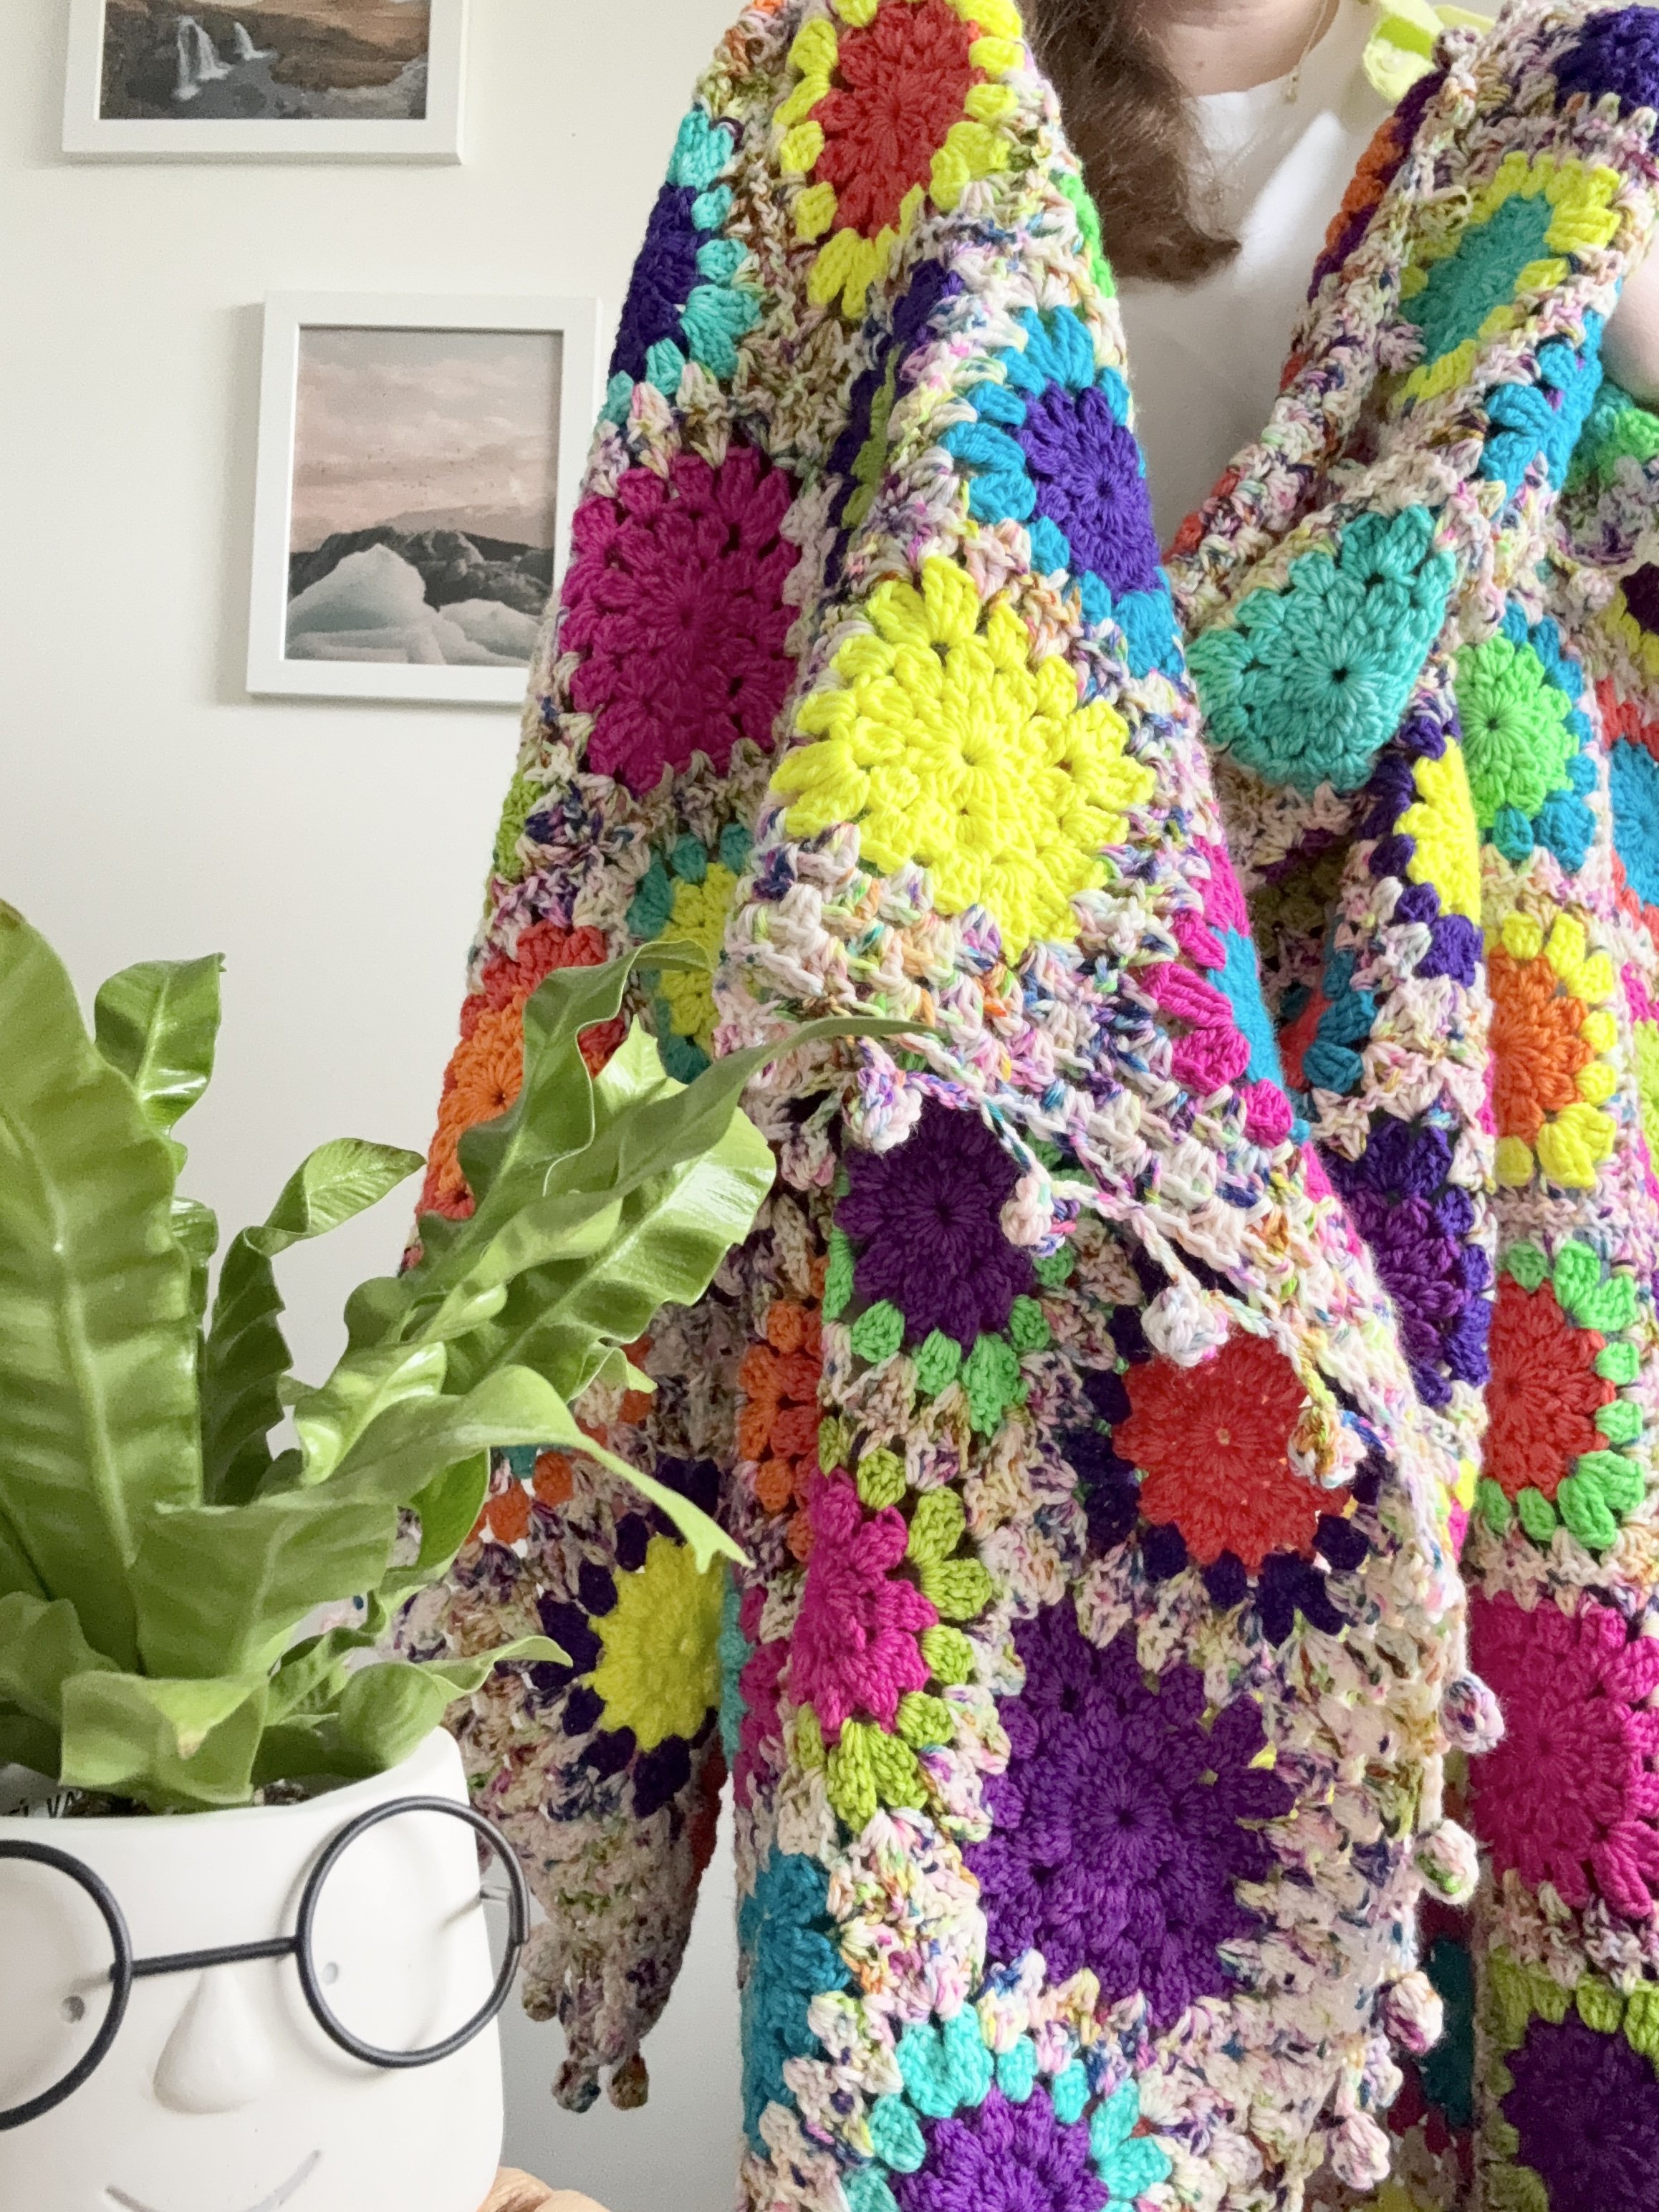
Blanket is constructed using CJAYG, where each square is joined to the next while completing another round on each. If you choose to join your blanket a different way-please note yarn quantities will differ (you’ll need more).
Don’t forget to share your makes on Instagram and Facebook! I always love seeing what you’ve all worked up. Tag me on Instagram @nautikrallcrochet or Facebook @nautikrall_crochet
Colour Legend
Pattern Graph/Schematic
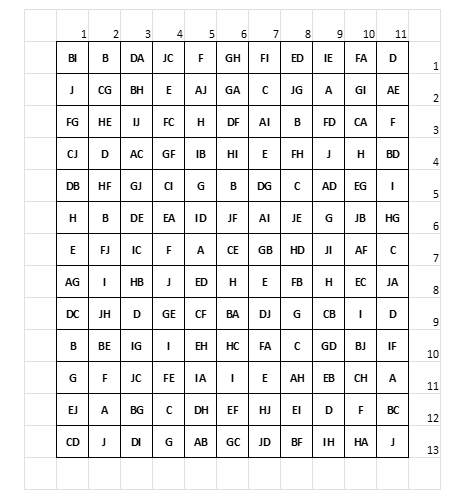
Blanket Dimensions: 11 squares x 13 squares= 143 squares
The schematic above is written out (Rnd 1-2, Rnd 3). The First Letter indicating colour for Rnds 1-2 as the Starburst Centres. The Second Letter denotes the colour used in the last Rnd. If there is only one letter written in the square, the entire square is made of one colour.
Pattern Starburst Granny Square:
Round 1
Ch 5, sl st into 5th ch from hook to create centre ring.
Ch 2, work 1 DC into centre ring, ch 1 (this counts as first cl st).
Work 11 [2 DC cl] into centre ring (12 cl sts).
Join rnd with sl st to the ch-1 sp between the first and second cl sts at beginning of rnd.
Do not fasten off…
Round 2
Ch 2.
Work a [4 DC cl] into same sp, ch 2.
Work a [4 DC cl, ch 2] into each ch-1 sp around (12 cl sts).
Join rnd with sl st into the first ch-2 space of the rnd (not into the top of the cl st).
Fasten off for multi-coloured squares (if working a one colour square, do not fasten off)…
Round 3
Join next colour into any ch-2 sp and ch 3 (if working a one-colour square, just ch 3).
Work [2 tr, ch 2, 3 tr] into same sp.
*Work 3 DC into next ch-2 sp, twice.
Work [3 tr, ch 2, 3 tr] in next ch-2 sp.*
Repeat from to 2 more times.
Work 3 DC into next ch-2 sp, twice.
Join rnd with sl st into the top of the first tr (not the ch-3).
Fasten off.
**Please see video tutorial below on how to crochet the Starburst Granny square:
Assembling Motifs with Continuous Join-As-You-Go (CJAYGO)
With RS of squares face up, lay out all squares in the arrangement from the colour graph above.
Using joining colour, start in top right-hand corner to join squares across the rows.
Example: First row will be joined from square number 11 (D) across to square number 1 (BI). The second row will start with square number 22 (AE) and be worked across to square number 12 (J).
Following along with the video tutorial, crochet squares together until blanket is complete.
Once back to the start of the blanket (in the top right-hand corner)- DO NOT FASTEN OFF.
You are now ready to start Border Round 1.
**Please see video tutorial below for how to join Starburst Granny Squares with CJAYG to create blanket:
Border
**Continued from CJAYG…
Round 1
Sl st over two sts into the ch-2 corner sp.
Ch 2, work [2 DC, ch 2, 3 DC] into corner sp.
Continue working 3 DC into each sp between DC shells around edge of blanket.
Where two squares meet; work 2 DC in each corner sp.
Work [3 DC, ch 2, 3 DC] into four corners of blanket.
To join round, sl st into the top of the first DC (not into the ch-2), do not fasten off…
Round 2
Sl st over two sts into the ch-2 corner sp.
Ch 2, work [2 DC, ch 1, 3 DC] into corner sp.
Continue working 3 DC into each sp between DC shells around edge of blanket.
Work [3 DC, ch 1, 3 DC] into each corner.
To join round, sl st into the top of the first DC (not into the ch-2), do NOT fasten off…
Round 3
Repeat Round 2, do not fasten off…
Round 4
Complete one round of pom-pom border to finish off blanket.
Fasten off, weave in all ends.
***Please see video tutorial below for how to crochet pom pom border:
~The End~
The pattern, the photographs and video tutorials in this document are the property of NautiKrall Crochet. You may sell items you make from this pattern; but may not sell, reproduce, or distribute this pattern, in whole or in part, as your own.
Copyright © 2026 NautiKrall Crochet – All right reserved.